So how do you integrate all these concepts—swimming on your sides, using leg-driven body rotation as your primary source of propulsion, and front-quadrant swimming—into normal swimming? You will use several stroke-integration drills. Before you begin learning these drills, however, you already
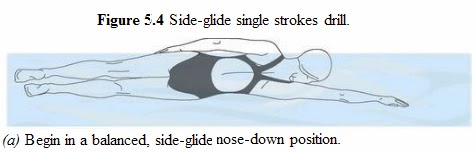
 This drill, best learned with a snorkel, introduces the skill of taking a single stroke to turn from a side-glide position on one side of your body to a side-glide position on the other side. Start by pushing off from the wall. Begin kicking easily in a side-glide nose-down position (figure 5.4a). Check your posture and balance feedback tools. Recover your side arm above the surface of the water. As that hand passes your head (figure 5.4b),
 use one of your kicks to begin rotating your body, keeping your nose pointed down. As your core rotation begins, your recovering hand should enter the water and the other arm should begin the stroke (figure 5.4c).
 Your hands should pass each other in the passing zone. Continue the stroke (figure 5.4d) while rotating toward the other side-glide position. You want your rotation to reach the other side-glide position just as the arm stroke finishes at your thigh.
 You should now be in a side-glide nose-down position (figure 5.4e). Take a few breaths as you continue to kick easily. Check your posture and balance feedback tools as you continue kicking on your side a little longer.
 Repeat these actions for each arm for the entire length of the pool.
should have become comfortable with all the posture and balance drills. And you should continue practicing them even as you add the more complex drills that follow.
As you practice these drills, notice that when you breathe without a snorkel, you will be taking roughly half your breaths to one side of your body and half to the other side. It is important to breathe well to either side of your body. This idea applies to all of the drills and to full-stroke swimming as well.
Side-Glide Single Strokes (SGSS)
 This drill, best learned with a snorkel, introduces the skill of taking a single stroke to turn from a side-glide position on one side of your body to a side-glide position on the other side. Start by pushing off from the wall. Begin kicking easily in a side-glide nose-down position (figure 5.4a). Check your posture and balance feedback tools. Recover your side arm above the surface of the water. As that hand passes your head (figure 5.4b),


The key to properly timing the arm’s motion with a rotation kick is to have your hand enter the water just as the leg on the opposite side kicks forward (the downbeat of the kick). Alternatively, you can focus on your hand entering the water just as the leg on the same side recovers backward (the upbeat of the kick). It will be easier to pair a hand entry with a kick on one side than on the other. Getting a feel now for either or both of these pairings will help you later when you start connecting multiple strokes to rhythmic rotations.
Once you’ve mastered this drill while using a snorkel, it’s time to add real breathing motions. Without the snorkel, start side-gliding with your nose down and begin the drill as you did before. As the rotation and stroke begin, however, allow your head to turn with your body instead of remaining nose-down. You will end up in a side-glide nose-up position at the end of the stroke instead of in a nose-down position. Take a few breaths as you continue to kick easily. Check your posture and balance feedback tools. Turn your head back to a nose-down position. You are now in a starting position on the opposite side from where you started. Check your posture and balance again as you remain on your side for a few more kicks. Repeat these actions for each arm for the entire length of the pool.
Despite the work you did in the SGB drill, you may still tend to lift your head or upper body as your body rotates to the nose-up position. Turning your head separately makes this situation even worse. Instead, proactively use the red-dot focus point to keep your head low as you turn for air. Also try using the strategy that you used to start the SGNU drill, holding your breath until you are sure that you are balanced and comfortable. Practice until you consistently rotate directly to a balanced nose-up position without having to readjust or “settle.”
Be patient with the SGSS drill. Your brain and body may want to rush into the next stroke right away. Resist this temptation. Instead, each time you get to the next side-glide position, pause long enough to assess, correct, and plan ahead by doing the following:
 FOCUS POINT ➤ The Glove
FOCUS POINT ➤ Wide Tracking
FOCUS POINT ➤ The Glove
FOCUS POINT ➤ Wide Tracking
• Assess the position you finished the rotation in—posture, balance, lead arm angle—and how you got there. By the time you start the SGSS drill, you should have done enough side-gliding and spent enough time checking each of the feedback tools to know whether you have finished with an impeccable, horizontal tight line.
• Correct any flaws in your posture, balance, or position.
• Plan ahead for the next repetition. Decide whether you need to make any changes, and mentally rehearse your next step before continuing.
As you improve at the SGSS drill, you will gain confidence in your ability to maintain your posture and balance as you rotate, seldom or never needing to make corrections after assessing your performance.
Stepping-Stone to SGSS
If you find it difficult to stay in balance with your lead arm and your passing zone in front of your head, try the following: Instead of rotating completely from one side to the other, stop halfway, when you are flat on your front, with both arms extended in front of you. Continue kicking in this position for several seconds until you are sure that you are balanced. Then continue the rotation and stroke to your other side.
Feedback Tools
• You already know, and should use, all the feedback tools for your side-glide positions.
• Keep pressure on your buoy as you rotate so that your hips stay at the surface throughout the rotation to your other side. If your butt does not remain at the surface of the water as you rotate and if you are not able to feel your flank (or the dry strip of flesh on the side arm all the way to your wrist) exposed just as you get to the side-glide position, then you have either (1) lost your tight line, (2) lost buoy pressure, or (3) lifted your head. A lifted head is the most likely culprit, and it will almost certainly cause you to lose your buoy pressure and your tight line.
• When you are not using a snorkel, check that your head and body rotate as a single unit rather than head first or body first. Think, Head and hips move together.Experiment a Bit
With practice, you will gradually spend less time in each side-glide position checking your balance and posture. You can then experiment by performing some of the repeats without turning your head to breathe, remaining nose down. Common breathing patterns include breathing every second repeat or every third repeat. Of course, experimenting with shifting between schlumpy and tight-line postures should be a habit by now.The SGSS drill is a great tool for learning a variety of concepts and skills that you’ll eventually apply to other drills and to full-stroke swimming. Each of these concepts and skills will, in turn, refine your execution of the SGSS drill. Before moving on to the next drill, spend some time working on each of the following focus points, one at a time, in the SGSS drill.

FOCUS POINT ➤ Pierce (Not Push) Down to Extension
It is important how you extend your arm at a downward angle in the water. As you begin to rotate, your fingertips should pierce the surface of the water and then continue along a straight line, at a slight downward angle, until your arm is fully extended. You also want your forearm to slide through the same small hole that your hand did. A common error is to extend the arm straight forward, either just above or just below the surface, and to then push the hand and arm down to the desired angle. This puts unnecessary stress on the shoulder, forces your front end up and your hips down, and wastes energy.
FOCUS POINT ➤ The Glove
Most novice and intermediate swimmers are rear-quadrant swimmers. To make the change to front-quadrant swimming, it is useful to sometimes exaggerate the arm timing a bit. Imagine that the extended hand has a loose-fitting glove on it. Leave it extended as you begin to rotate and as the other hand pierces the surface of the water forward and down toward the top of the extended hand. As soon as the fingertips slip under the cuff of the glove, the palm of the glove opens, allowing the extended arm to start stroking while the recovering hand continues to slide forward fully into the glove. The idea is to transfer the imaginary glove from hand to hand out in front at the extension point. Note that this is an exaggerated movement for instructive purposes only, and that when swimming normally, the two hands will not actually touch. You will, however, want the recovering hand to almost catch up to the extended hand before the extended arm begins the next stroke—hence, the passing-zone concept.
FOCUS POINT ➤ Wide Tracking
The glove focus point gives you a good feeling for where your arms should be longitudinally, but it has each hand entering and extending along a line directly in front of your head—as if you were moving along a monorail. What you want at any time you are not using the glove focus point is for each hand to enter and extend directly in front of its own shoulder—as if you were moving along a standard two-rail track with rails roughly shoulder-width apart. Taking wide tracking a step further, you want the general lines of the strokes to be shoulder-width apart as well.
FOCUS POINT ➤ Patches and Cheeks
Good balance means keeping a horizontal position at all times with your hips right at the surface. When swimming or when doing any drill that involves body rotation, focus on keeping a patch of skin on one hip or thigh just below your suit, or one or both butt cheeks, exposed to the air at all times—especially when breathing. A combination of tight-line posture and sufficient buoy pressure is required. Lifting the head or using a hand to push down on the water in front of the body will quickly sink the hips.
Three Strokes & Glide (3S&G)
Once you have worked enough with the focus points in the SGSS drill to feel comfortable and confident with them, it is time to take more strokes. This new drill will get you much closer to swimming. As the name suggests, it means to take three strokes and then glide. Though it sounds simple, to get it right, you should learn it in several steps:
1. Using your training snorkel, start by pushing off on your right side and kicking in the side-glide position, nose down. As soon as you are in a tight line and in balance, recover the trailing (left) arm over the water, and rotate and stroke onto your left side as you did in the SGSS drill. Immediately begin to recover the trailing (right) arm; then, as it passes your head, rotate onto your right side while taking the second stroke. As soon as you are on your right side, recover the trailing (left) arm. As it passes your head, rotate again while taking your third stroke onto the left side. When you are fully on your side, stop all action except kicking. Spend as much time as you need in the side-glide position to assess and correct your posture and balance and to plan for any changes that might improve the next set of three strokes. Note that you are now gliding on the left side of your body, opposite the side you started on. Go through another set of three strokes (which will return you to your original side-glide position on your right side). Again assess, correct, and plan ahead. Repeat for the length of the pool. Each cycle of three strokes is done in a continuous swimming rhythm. Expanding upon the hand-entry-to-kick coordination from the SGSS drill, you now want to rhythmically execute that coordination with successive hand entries in each three-stroke cycle. Practice this step until you can complete each set of three strokes with good posture and balance and without having to adjust anything.
2. The second step in the learning progression is similar to the first step. But instead of using the snorkel and keeping your nose down, you will now rotate your head to breathe on the third stroke of each set of strokes. Start the drill as you did before, but as you begin the third stroke, let your head turn with your body just as it did in the SGSS drill. As you finish that stroke and reach your side-glide position, your nose will be up. Assess and correct your posture and balance. Take a breath (or several, if needed) and turn your head back to the nose-down position, assess and correct your posture and balance again, and plan ahead for the next cycle. Repeat for the length of the pool. Practice this step until you can complete each set of three strokes fully balanced, in the side-glide nose-up position, and without having to adjust anything.
3. The final step in learning 3S&G is to take your breath on the second stroke of each set of strokes and to do the glide portion between each set of three strokes in a nose-down position. As before, assess and correct posture and balance and plan ahead during the glide before you continue with the next set of three strokes. The goal of this step is to take that breath by letting your head rotate with your body to a nose-up position, then to inhale, and then to let your head rotate with your body back to a nose-down position, all without disrupting the rhythm of strokes and without losing your posture or balance. If after a couple of sets of three strokes you find that you need more air, you may turn your head to take an additional breath or two during the glide phase (but only after you have assessed and corrected your posture and balance).Feedback Tools
• Each time you rotate and stroke, you should be aware of your navel pointing directly toward the sidewall, just as it does when you are in side-glide position.• Each time you take a stroke, be sure to swap hands out in front of your body, perhaps using the glove focus point from time to time.• As you reach the side-glide position at the end of the third stroke of each set, you should feel the dry strip of flesh along your trailing arm. If not, you have either lifted your head up, let pressure off your buoy, lost your tight line, or some combination thereof.• Make any necessary corrections and stay in the side-glide position long enough to think through any changes you will need to make on the next set of three strokes.Experiment a Bit
If you carefully follow the progression I’ve laid out, mastering each step before moving on to the next, you will end up with a drill that is close to full-stroke swimming but that provides opportunities to assess, correct, and plan ahead. As you improve at the 3S&G drill, you can take more strokes in each set of strokes, effectively turning the drill into a 5S&G or 7S&G drill in which you will take two or more breaths during each set of strokes. Only increase the number of strokes once you are able to maintain posture, balance, and rhythm while taking breaths and only once you are able to enter each glide phase with a fully balanced tight line that needs no correction.
Комментариев нет:
Отправить комментарий