
5.1 Before You Get Started
To use the Family Safety features in Windows 8.1, your computer must be set up with at least one password-protected administrator user account. If you set up multiple user accounts with administrative privileges, make sure that they’re all password protected. And make sure the kids don’t know the password. Otherwise, the kids can easily go in and change any parental controls you import.With Windows 8.1, each child is given his or her own child user account. Creating and configuring a child user account is easy to do. Here are the steps:
1. Log into Windows with a user account that has administrative privileges.
2. Open the Other Accounts page from PC Settings, Accounts as described in Chapter 4 in the “Creating and Managing User Accounts” section and Figure 4.11. Click Other accounts and then click Add an Account. At the bottom of the page, click the Add a Child’s Account link. This will bring you to the first page to create your child’s account.
3. On the first page decide if your child is going to use e-mail with the account. If an e-mail address is needed, enter the e-mail address in the address field, as shown in Figure 5.1 and click Next.
4. The page to enter personal details required for a Microsoft account appears as shown in Figure 5.2. This information is mandatory. Fill in the details and click Next.
5. The page to enter Security information appears. This information is also mandatory. Fill in the information for the account and click Next.
6. The next page that appears requests mandatory communication information. It’s the same page as the one shown in Chapter 4 in Figure 4.14. Provide the information and click Next to view a summary of the information that will be used to create the account.
 7. The final page that appears (shown in Figure 5.3), gives you the opportunity to create and add the child account and apply family monitoring to it. Click Finish to complete the process.
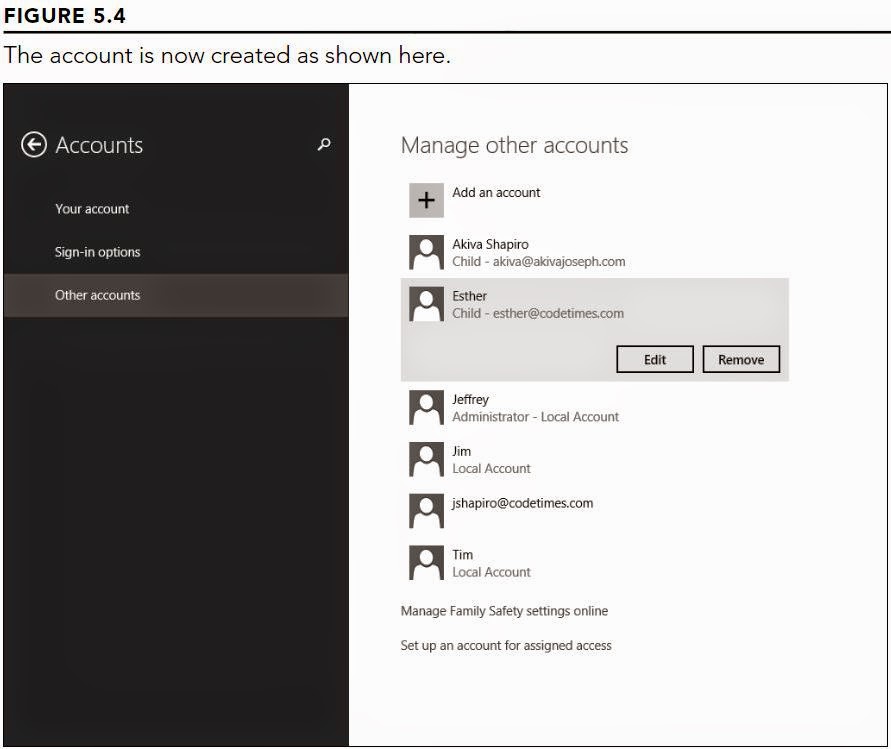
The child account is now added, as shown in Figure 5.4.

5.2 Setting Up Windows 8.1 Family Safety
• Windows Web Filters: Specify the type of content that the child is allowed to view.Family Safety setting can be saved on the Microsoft Family Safety website or locally on the computer the child will actually use. The following section manages and stores the Family Safety data on the computer the child will use.
• Time Limits: Specify the hours during each day that the child can use the computer.
• Windows Store and Game Restrictions: Specify whether the child can access the Windows Store and if the child can play games on the computer. You can also set the rating and content types that are allowed.
• App Restrictions: Select which apps and programs the child can run.
5.2.1 Getting to the Family Safety page
Fortunately, you don’t need to be a computer guru to set up parental controls in Family Safety. After you’ve set up appropriate user accounts, the rest is easy. Here are the steps:1. Log into Windows with a user account that has administrative privileges.
2. Do whichever of the following is most convenient for you at the moment:
• At the Windows Start screen, press Windows+W. Type fam in the search box, click Settings, and click Family Safety.3. A page appears that shows the name and picture for each user account you’ve created, as in the example in Figure 5.5. Click the Child user account for which you want to set up parental controls.
• At the Windows desktop, press Windows+X, and choose Control Panel, click User Accounts and Family Safety, and then click Family Safety.
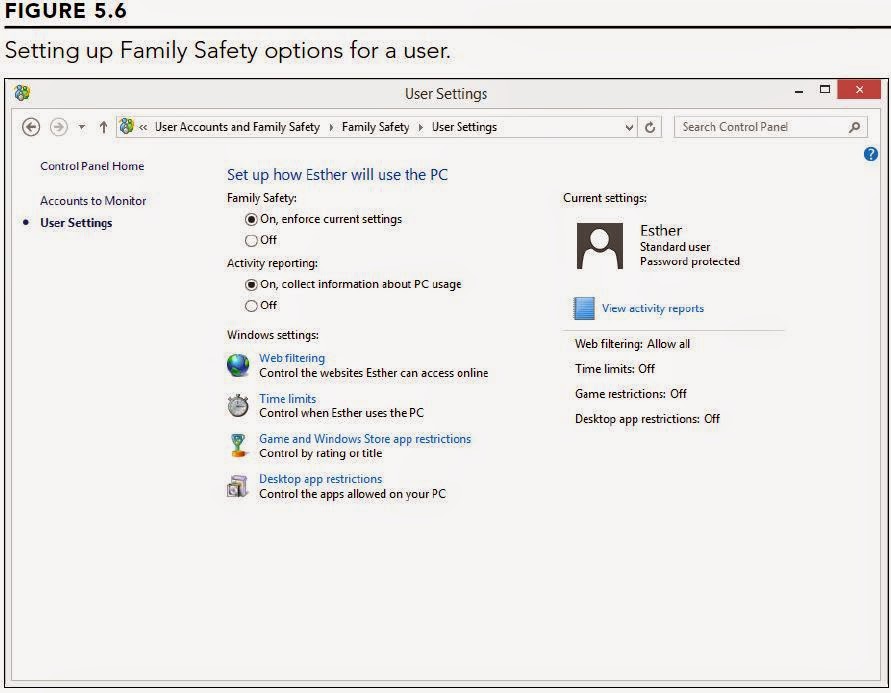 Now you’re in the parental controls page shown in Figure 5.6. Any options you choose are applied to the account shown in the page. For example, in Figure 5.6, we’re setting up Family Safety options for a user named Esther.
To activate Family Safety for the account, choose On, Enforce Current Settings under the Family Safety heading. After you turn on these parental controls, you can choose which controls to apply for the selected user.
5.2.2 Setting Web Filtering
 To control which websites a child can view, click the Web Filtering link. You can allow or block access to specific websites, or specify that Windows should block web content automatically. Figure 5.7 shows the Web Filtering page. If you use the former feature, manually specify which sites can be visited (for example www.disney.com) and which are blocked (for example, sites that are suspected as being adult-related sites). If you use this feature, you can limit your child’s web activity only to those sites you specify in the Allowed list. This provides you absolute control over the sites your child can view.
The other options on the Web Restrictions page relate to content areas that Family Safety monitors automatically. If you choose to let Windows block web content automatically, you have the following categories from which to choose:
• Allow List Only: Allows all websites that are in the list. All other sites are blocked. This is the most secure option because it allows you to explicitly include only the websites that you have cleared for access.
• Designed for Children: Blocks suspected adult-related websites. Allows your child to view sites on the Allow list and in this category. When your child visits popular search engines — such as Google, Bing, and Yahoo! — the SafeSearch setting is automatically enabled, limiting the types of search results your child will see and blocking adult images.
• General Interest: Blocks suspected adult-related websites. Allows your child to view child-friendly sites, general interest sites, and those specified on the Allow list. When your child visits popular search engines — such as Google, Bing, and Yahoo! — the SafeSearch setting is automatically enabled, limiting the types of search results your child will see and blocking adult images.
• Online Communication: Blocks suspected adult-related websites. Allows your child to view child-friendly sites, general interest sites, social media sites, web chat, web mail, and those specified on the Allow list. When your child visits popular search engines — such as Google, Bing, and Yahoo! — the SafeSearch setting is automatically enabled, limiting the types of search results your child will see and blocking suspected adult images.
• Warn on Adult: Does not block suspected adult-related websites, but does display a warning if the site contains adult-related material. All other sites are available. When your child visits popular search engines — such as Google, Bing, and Yahoo! — the SafeSearch setting is automatically enabled, limiting the types of search results your child will see and blocking adult images.
• Block File Downloads: This check box prevents files from being downloaded by the user to the PC, intentional and unintentional.
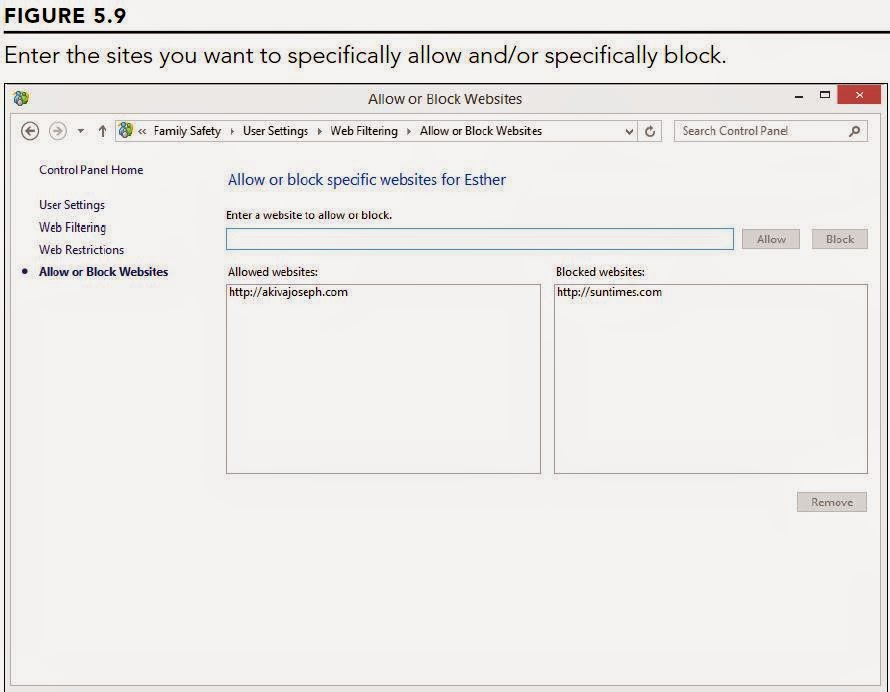 To edit the Allow List Only option, click Allow List Only and then click the Click Here to Change Allow List link. The Allow or Block Websites page appears. Figure 5.9 shows an example of this page, with some sample websites listed in the Allowed Websites and Blocked Websites lists. On the Allow or Block Websites page, enter the web address of a site you want to block or allow. Click the appropriate button — Allow or Block — for the site you enter. The site will appear in the Allowed Websites or Blocked Websites list.
Click the back button at the top right of the window when you finish. This returns you to the Web Restrictions page.
Click the User Settings breadcrumb on the address bar to return to the User Settings page when you’re finished setting Web Restrictions.
5.2.3 Setting time limits
To specify times when the child is allowed to use the computer, click Time Limits on the User Settings page (refer to Figure 5.6 to see what the User Settings page looks like). The Time Limits page (shown in Figure 5.10) opens. This page has the following two options:Use the Following steps to set a time allowance for a user:• Set Time Allowance: Enables you to specify if a user can use the computer all day, or only for a specified number of hours and/or minutes per day. For example, you might allow your child to use the computer one hour a day on weekdays, but then allow her three hours a day on weekends.
• Set Curfew: Enables you to specify times during the day when your child can use the computer.
1. Click the Set Time Allowance link to view the Time Allowance page.
2. Click the <username> Can Only Use the PC for the Amount of Time I Allow link (Figure 5.11 shows an example of weekday and weekend time limits).
3. To set the same time amount for every weekday, use the Hours and Minutes dropdown lists to the right of the Weekdays: Mon–Fri label to indicate how many hours and minutes to allow this user to use the computer. Do the same for the Weekend Sat–Sun setting.
4. If you want to specify different time limits for each day, however, click the down arrow to the left of the Weekdays: Mon–Fri label or Weekend: Sat–Sun label. You are shown options for each day of the weekday and weekend.
5. Click the back button at the top left of the page when you finish.
 Another way to regulate user access on a computer is to specify the actual time of day a user can be on the computer. Family Safety provides the Set Curfew option to control time-of-day access. Click Set Curfew on the Time Limits page to set a computer curfew.
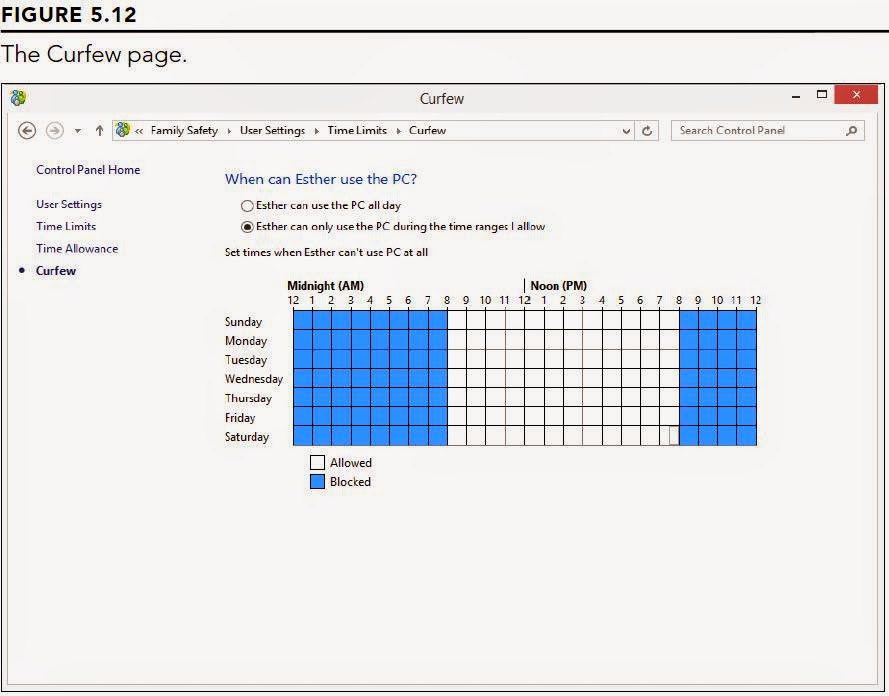
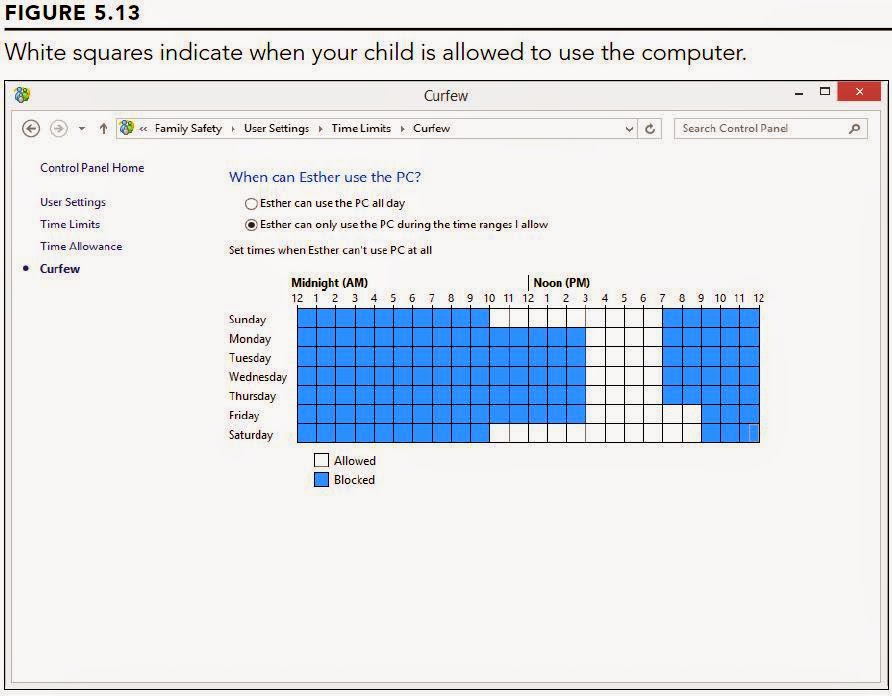 In Figure 5.12, you can see the Curfew page. On this page, you see a grid of days and times. Initially, all squares are white, meaning there are no time restrictions. You can click any time slot for which the child isn’t allowed to use the computer to turn it blue. Blue indicates that the time is blocked and the specified user (in our example, Esther) is not allowed to be on the computer during that time. You also can drag the mouse pointer through a longer stretch of time to block more time.
Optionally, you can place the mouse pointer in the upper-left corner of the grid and drag down to the lower-right corner to block all times. Then drag the mouse pointer through the times that the child is allowed to use the computer. For example, in Figure 5.13, the user is allowed to use the computer from 10:00 a.m. to 7:00 p.m. on Sunday; 3:00 p.m. to 7:00 p.m. on Monday, Tuesday, Wednesday, and Thursday; 3:00 p.m. to 9:00 p.m. on Friday; and 10:00 a.m. to 9:00 p.m. on Saturday.
Click the back button after setting allowable times. You can change those settings at any time by clicking Time Limits. For example, if the child needs a “time out” from the computer, you can block out all the times so that the child can’t use the computer at all!
5.2.4 Controlling Windows Store and game play
 Family Safety enables you to control access to the Windows Store and to downloading and/or playing games on a computer.
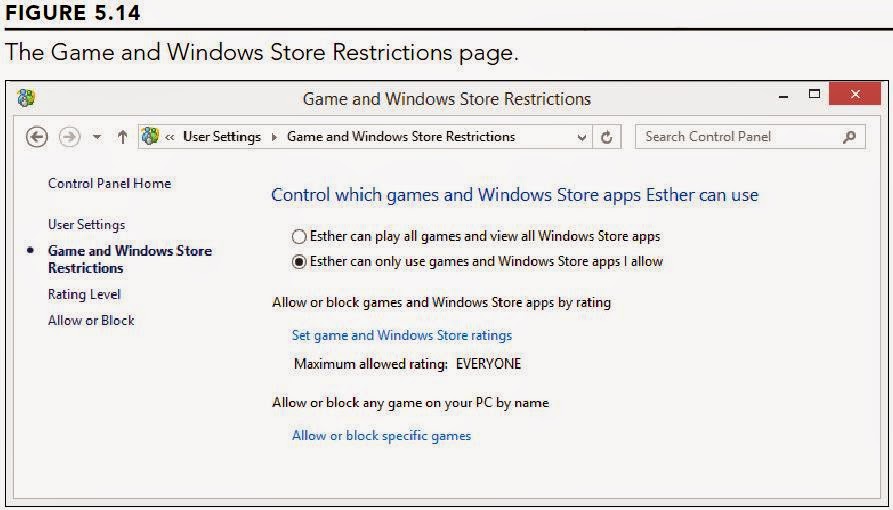
To control access to the Windows Store and to the type of apps that can be downloaded, return to the User Settings page and click the Game and Windows Store Restrictions link. Click the <username> Can Only Use Games and Windows Store Apps I Allow option. Figure 5.14 shows the Game and Windows Store Restrictions page after selecting that option.
To allow or block games and Windows apps that can be downloaded by the selected user, follow these steps:
To control the child’s game play, return to the Game and Windows Store Restrictions page and click Allow or Block Specific Games. Doing so opens a page for controlling if your child is allowed to play games on this computer. If you don’t want the child to use the computer for game play at all, choose No; otherwise, choose Yes.1. Click Set Game and Windows Store Ratings. The Rating Level page appears, as shown in Figure 5.15.
2. To specify the ratings that are okay for the user, click one or more of the ratings (such as Early Childhood, Everyone, and so on) that you want to allow the user to access. As you select a rating, a blue box appears around the rating name and description. To unselect a rating, click it again. Notice that as you go down the list of ratings and select a rating, all ratings above it are selected as well. That is, you cannot select a rating lower on the list, such as Teen, without also automatically selecting a rating higher on the list, such as Early Childhood.
3. Click the back button when you finish selecting the games and apps ratings you want to allow.

5.2.5 Blocking and allowing Apps
 With Family Safety, you can control the apps and programs that a user can run on the computer. Clicking Desktop App Restrictions on the User Settings page displays the App Restrictions page. By default, all users have access to run all apps. To limit the apps that a user can run, click the <username> Can Only Use the Apps I Allow link. When you do this, as shown in Figure 5.16, a message appears that indicates that the selected user can run only the apps and programs needed by Windows. Also, after a few moments, a list of apps and programs appear at the bottom of the page, which shows all installed apps and programs.
You use the list of apps to specify which apps are allowed by the selected user. Select the apps that you deem OK for the user to use. After you select the first app, notice that the warning called This Person Can Only Run Apps Needed by Windows disappears.
If you don’t see an app or program that you know is installed on your computer, click the Browse button next to Add an App to This List. You then can navigate to the app or program file (programs usually are .exe files), select it, and click Open. That app or program will be listed in the Check the Apps That Can Be Used list.

5.2.6 Viewing Family Safety Activity Reports
Windows 8.1’s Family Safety tool provides user activity reports. User activity reports provide a summary of user activity as it relates to Family Safety settings, including the following items:• Most Popular WebsitesTo see this report, click the View Activity Reports on the User Settings page.
• Latest Blocked Page
• PC Time Used
• Most Used Apps and Games
5.2.7 Viewing Family Safety Online Reports
A feature available with the Windows 8.1 Family Safety tool is access to an online Family Safety website. This website includes additional reports about Family Safety settings and allows you to modify Family Safety settings. To access the Family Safety online site, follow these steps:1. Click the Manage Settings on the Family Safety website link on the main Family Safety page. Internet Explorer launches.The changes you make online will copy down to your local version of Family Safety. The next time you open the User Settings page for a user, your online changes should be reflected.
2. If prompted, enter your Windows Live sign-in credentials, which you need to have to use the online Family Safety features. If you don’t have a Windows Live account, click the Sign Up button on the left side of the screen and follow the onscreen instructions. If you logged into Windows 8.1 using a Microsoft account, you can use those credentials as your Windows Live username and password.
3. Once at the Activity Reporting website, use the links on the left side of the page to view Family Safety activities and features. Most of these links mirror those found on the Family Safety pages that we already covered. However, if you click the Request link, you see those pages that a user has requested to view. Click one of the links to visit that site and to determine if you want to unblock its access.
4. Select an option from the Response drop-down list, such as Allow for This Account Only, to specify the type of access you want to give, if any.
5. Click Save to save any changes to settings you might make.
You can view these online reports and options for any user at any time as long as you have Internet access. This comes in handy if you’re away from your home computer and you want to view your child’s online activity and see if any requested sites have been added to the Requests page.
When you sign onto Family Safety online, Microsoft starts sending you e-mails with tips, additional information about Family Safety, and a link to the Family Safety website. You can opt out of these e-mails by clicking the Change Email Frequency link on the top of the Microsoft Family Safety e-mail. This connects you to the Family Safety website, on which you can change the frequency in the Email Notifications area. You might want to keep these notifications turned on until you become more familiar with Family Safety.
5.3 Other Online Safety Resources
Technical approaches to online safety, such as parental controls, are a good thing. But they can’t cover all possible risks. Kids can get involved with instant messaging and chats in which people aren’t always who they claim to be.Children should be taught some basic ground rules. For example, children should never give out personal information, such as where they live or go to school. If anything makes them feel uncomfortable, they should report it to their parents. They should never agree to meet with anyone you don’t know.
As a parent, you have many online resources for sharing your concerns with others and getting advice. You don’t need to be a technical whiz to take advantage of these sites. Here are some you might want to add to your Favorites:
• CyberAngels: www.cyberangels.org
• GetNetWise: www.kids.getnetwise.org
• Microsoft Safety & Security Center: www.microsoft.com/security/
family-safety/childsafety-internet.aspx
• SafeKids.com: www.safekids.com
5.4 Wrap-Up
The Internet is here to stay. Today’s children will likely use it as their main source of information and communication throughout their lives. The Internet is also very much a public place, a direct reflection of the world at large. Although most people online are perfectly normal, the Internet has its share of wackos, just as the real world does.Knowledge is a parent’s best defense against Internet dangers. A parent who has been out of the loop in terms of technical advances over recent years will feel some helplessness and insecurity about keeping kids safe online. Setting up user accounts and parental controls is a great way to get started in taking control of kids’ computer use. Monitoring their activity is another. Here’s a quick wrap-up of the main points covered in this chapter:
• A parent should set up at least one password-protected administrative user account to take control of the computer.
• Each person who uses the computer can have a standard account, which offers greater security than an administrative account.
• The person with the administrative account can use parental control features of Microsoft Family Safety to set limits on Internet and computer usage for people using standard accounts.
• The administrator can also use activity reports to monitor standard users’ activities.
• Parents can find support and stay up-to-date through many websites dedicated to online safety.
Комментариев нет:
Отправить комментарий