In today’s busy world, few people have the time to sit down and learn to use a computer. Many books and online tutorials don’t really help because they assume you already know all the basic concepts and terminology. That’s a big assumption because the truth is that most people don’t already know those things. Most people don’t know a file from a folder from a megabyte from a golf ball. These just aren’t the kinds of things we learned about in school or from our day-to-day experiences.
This chapter is mostly about the kinds of things everyone else assumes you already know. It’s for the people who just bought their first computer and discovered it has this thing called Windows 8 on it. Or the people who were getting by with an older computer but now have a new Windows 8 computer and really want to know more about how to use it.
We often refer to the skills in this chapter as “everyday skills” because they’re the kinds of things you’ll likely do every time you sit down at the computer. In this chapter, we point out the name and purpose of many elements you’ll see on your screen. Together, these bits of information provide a foundation of basic knowledge of how you use a computer, in general, to get things done. And it all starts with logging in.
When you rest your hand comfortably on the mouse, the left mouse button should be under your index finger. You don’t want to hold the button down, however. Just rest your index finger on it lightly.
 The button on the right is the secondary or right mouse button. In contrast to the primary mouse button, clicking the secondary mouse button usually doesn’t make an action take place directly; instead, it shows you various actions you can take.

The term hover means the same thing as “point.” For example, the phrase “hover the mouse pointer over the Desktop tile” means the same as “point to the Desktop tile.”
When you point to an item on the Windows desktop, the item’s name typically appears in a tooltip (a small box that appears, telling what you’re pointing to). For example, if you point to a date and time on the notification bar on the Windows desktop taskbar, the day and date appear in a tooltip near the mouse pointer. The tooltip tells you the name of the item you’re pointing to. Figure 3.1 shows an example of a tooltip when pointing to the desktop calendar.


You will see the following several times in this book: Press Windows+X while on the Windows desktop. This displays the Windows 8.1 Quick Link menu. It displays in the same location that the Start menu in previous versions of Windows (including Windows 7, Vista, XP, 98, and 95) displayed. The Quick Link menu includes several key menu options to help you locate system apps and programs, such as the Control Panel, Event Viewer, and so on.
You’ll often see the term shortcut key used to refer to key+key combinations. The “shortcut” part refers to the fact that the keystroke is an alternative way of doing something with the mouse. (It may not seem like much of a shortcut, however, if you can’t type worth beans!)
Much as we all hate to learn terminology, knowing the terms and keyboard keys we just described is critical to learning how to use a computer. All written and spoken instructions assume that you know what those terms mean. If you don’t, the instructions won’t do you any good.
Okay, let’s move on to using the computer and to the names of things you’ll do, see, and use often.
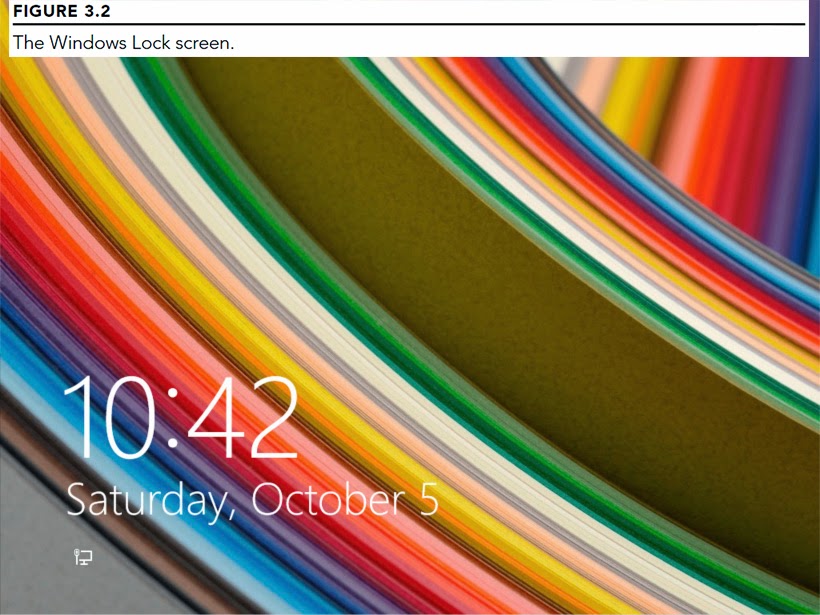 Obviously, the first step to using a computer is to turn it on. Shortly after you first start your computer, the Windows 8 Lock screen appears (see Figure 3.2). To log in, slide the display up. To slide on a touch device, move your finger from the bottom of the display toward the top. With a mouse, click and drag the display toward the top, or press the spacebar. Windows displays the list of user accounts available on the device. You learn more about user accounts in Chapter 4, but for now, all you need to know is that if you see user account icons shortly after you first start your computer, you have to click one in order to use the computer. Tap (or click) on a user tile to enter the password for that user account, and then press Enter or tap (or click) the arrow icon to the right of the password field.

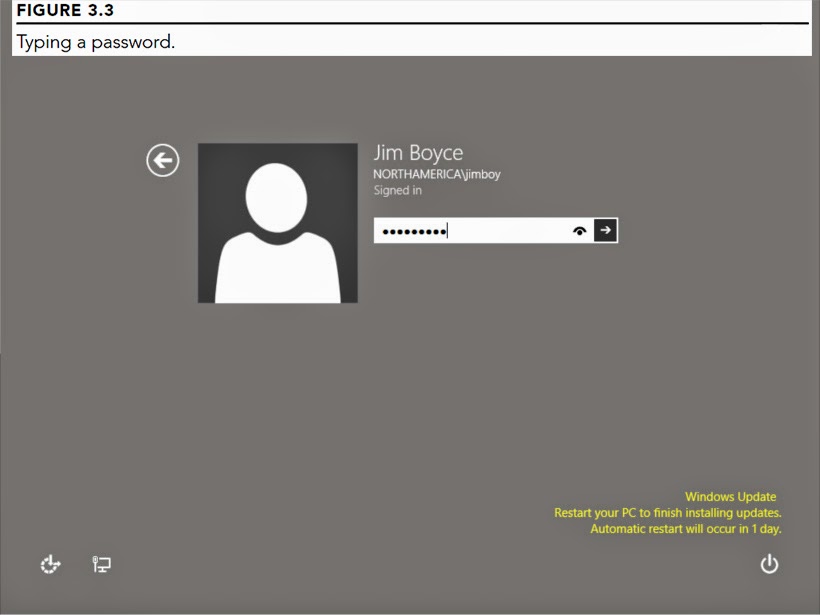 If the user account isn’t password protected, the Windows Start screen appears automatically. If the user account you clicked is password protected, a rectangular box appears instead. You have to type the correct password for the account to get to the Windows Start screen. The letters you type won’t show in the box by default. Instead, you’ll see a dot for each letter you type, as in Figure 3.3. This prevents others from learning your password by looking over your shoulder as you type it on the screen. To temporarily see the characters you enter, press and hold the eye icon on the right side of the password box. This toggles on the characters so you can see that what you typed is what you intended to type.
After you type the password, press Enter or click the arrow to the right of the password box.
After you’ve successfully logged in, the Windows Start screen appears.

 The desktop is accessed from the Start screen by clicking the Desktop tile. The desktop may get covered by program windows and other items, but the desktop is still under there no matter how much you clutter the screen. It’s the same as a real desk in that sense. Although your real desktop may be completely covered by random junk, your desktop is still under there somewhere. You just have to dig through the mess to get to it.
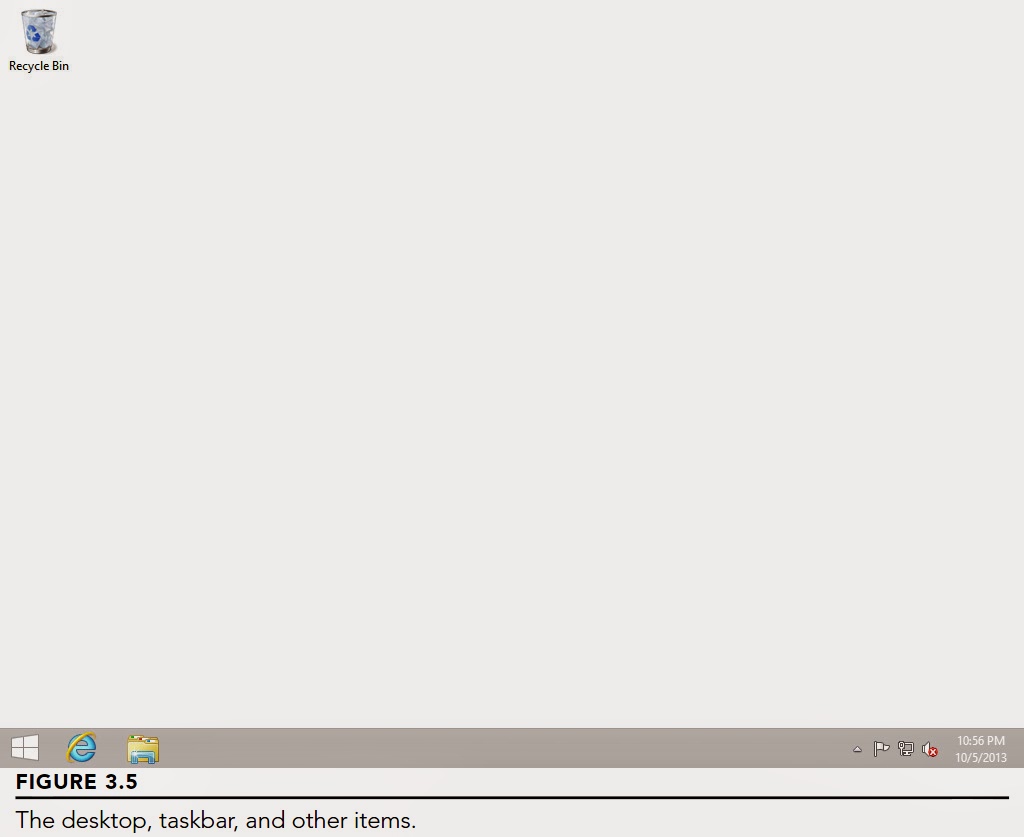
The two main components of the Windows desktop are the desktop itself and the taskbar. The desktop is where everything that you open piles up. The taskbar’s main role is to make it easy to switch from one open item to another. Everything you’ll ever see on your screen has a name and a purpose. Virtually nothing on the screen is there purely for decoration (except the wallpaper). Figure 3.5 shows the main components of the Windows desktop and other items. Your desktop might not look exactly like the picture and might not show all the components. But don’t worry about that. Right now, you want to focus on learning the names of the most frequently used elements.
Here’s a quick overview of what each component represents.

Rules always have exceptions. When it comes to desktop icons, the Recycle Bin is the exception. The Recycle Bin icon exists only on the desktop, and you won’t find it anywhere else. The role of the Recycle Bin is that of a safety net. Whenever you delete a file or folder from your hard drive, the item is actually just moved to the Recycle Bin. You can restore an accidentally deleted item from the Recycle Bin back to its original location.
In addition to the Recycle Bin, you have other built-in desktop icons from which to choose. If you want to take a shot at adding icons, you have to get to the Personalization page and make some selections. To get to the Personalization page, use one of the following methods:

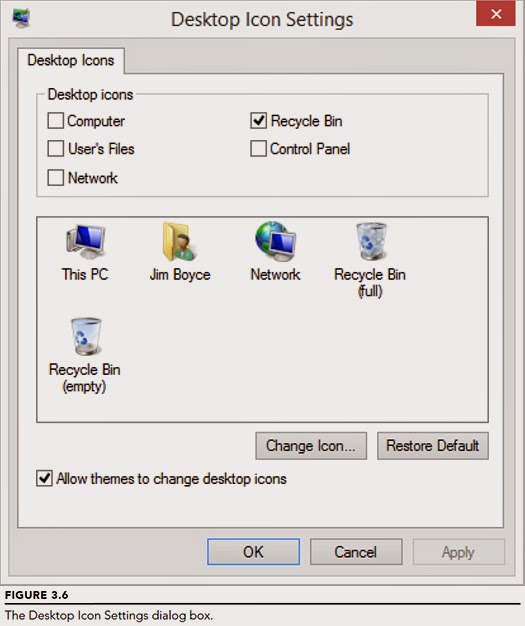 The Personalization Control Panel applet opens. In its left column, click Change Desktop Icons. You see a dialog box like the one in Figure 3.6. It’s called a “dialog” box because you carry on a sort of dialog with it. It shows you options from which you can pick and choose. You make your choices and click OK. You’ll see menu dialog boxes throughout this book.
To make an icon visible on your desktop, select (click to put a check mark in) the check box next to the icon’s name. To prevent an icon from appearing on the desktop, click the check box to the left of its name to deselect it (remove the check mark). In the figure, we’ve opted to show just the Recycle Bin.
You can choose a different picture for any icon you’ve opted to show on the desktop. Click the icon’s picture in the middle of the dialog box. Then click the Change Icon button. Click the icon you want to show and then click OK. If you change your mind after the fact, click Restore Default.
Click OK after making your selections. The dialog box closes, and the icons you choose appear on the desktop. However, you might not see them if that part of the desktop is covered by something that’s open. Don’t worry about that. You learn about how to open, close, move, and size things on the desktop a little later in this chapter.
If nothing is covering the desktop, but you still don’t see any desktop icons, they might just be switched off. We cover this topic in the next section.
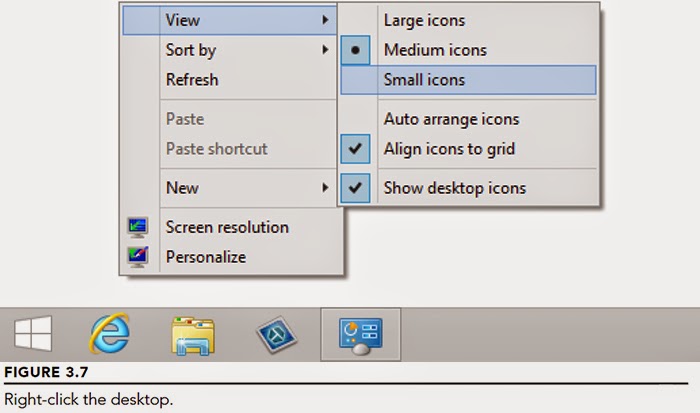 As you discover in Chapter 10, there are many ways to customize the Windows 8 desktop. But if you just want to make some quick, minor changes to your desktop icons, right-click the desktop to view its shortcut menu. Items on the menu that have a little arrow to the right show submenus. For example, if you right-click the desktop and point to View on the menu, you see the View menu, as shown in Figure 3.7.
The last item on the View menu, Show Desktop Icons, needs to be selected (checked) for the icons to show at all. If no check mark appears next to that item, click the item. The menu closes, and the icons appear on the desktop. When you need to see the menu again, just right-click the desktop again.
The top three items on the menu — Large Icons, Medium Icons, and Small Icons — control the size of the icons. Click any option to see its effect. If you don’t like the result, right-click the desktop again, choose View, and choose a different size.
 The Sort By option on the desktop shortcut menu enables you to arrange desktop icons alphabetically by Name, Size, Item Type, or Date Modified. However, no matter how you choose to sort icons, the built-in icons are sorted separately from those you create.

You don’t need to do anything to set up Jump Lists — they happen automatically. Whenever you want to use a Jump List, just right-click a taskbar icon and choose from the list the item you want to open.

This chapter is mostly about the kinds of things everyone else assumes you already know. It’s for the people who just bought their first computer and discovered it has this thing called Windows 8 on it. Or the people who were getting by with an older computer but now have a new Windows 8 computer and really want to know more about how to use it.
We often refer to the skills in this chapter as “everyday skills” because they’re the kinds of things you’ll likely do every time you sit down at the computer. In this chapter, we point out the name and purpose of many elements you’ll see on your screen. Together, these bits of information provide a foundation of basic knowledge of how you use a computer, in general, to get things done. And it all starts with logging in.
3.1 Terminology for Things You Do
If you’re new to computers, the first step is to learn a little terminology about actions you perform to operate the computer. We assume you know what the mouse is. When you move the mouse, the mouse pointer on the screen moves in whatever direction you move the mouse. Most mice have two buttons. The button on the left is the primary or left mouse button. It’s referred to as the primary button because clicking it always makes an action occur directly.When you rest your hand comfortably on the mouse, the left mouse button should be under your index finger. You don’t want to hold the button down, however. Just rest your index finger on it lightly.
3.1.1 Mouse terminology
Everyone uses some specific terms to refer to actions you perform with the mouse. These terms include point, click, double-click, right-click, and drag.3.1.1.1 Point
The term point, when used as a verb, means to touch the mouse pointer to an item. For example, “point to the Desktop tile” means to move the mouse pointer so that it’s positioned over top of the Desktop tile (the tile named Desktop that, by default, is at the lowerleft corner of the Start screen). If the item you want to point to is smaller than the mouse pointer, make sure you get the tip of the mouse pointer arrow on the item. Whatever the tip of the mouse pointer is on is the item to which you’re pointing.The term hover means the same thing as “point.” For example, the phrase “hover the mouse pointer over the Desktop tile” means the same as “point to the Desktop tile.”
When you point to an item on the Windows desktop, the item’s name typically appears in a tooltip (a small box that appears, telling what you’re pointing to). For example, if you point to a date and time on the notification bar on the Windows desktop taskbar, the day and date appear in a tooltip near the mouse pointer. The tooltip tells you the name of the item you’re pointing to. Figure 3.1 shows an example of a tooltip when pointing to the desktop calendar.
3.1.1.2 Click
The term click means to point to an item and then tap the left mouse button. Don’t hold down the left mouse button. Just tap (press and release) it. It makes a slight clicking sound when you do. For example, the phrase “click the Desktop tile” means “put the mouse pointer on the Desktop tile on the Start menu and tap the left mouse button.” When you do, the Windows desktop appears.3.1.1.3 Double-click
The term double-click means to point to an item and then tap the left mouse button twice, quickly. Don’t hold down the button and don’t pause between clicks. Just tap the left mouse button twice. You use double-clicking to open items represented by icons on your screen.3.1.1.4 Right-click
The term right-click means to point to an item and then tap the right mouse button. Again, don’t hold down the mouse button, and don’t use the left mouse button. Whereas clicking an item usually takes an immediate action, right-clicking presents a shortcut menu of things you can do with the item. You’ll see many examples throughout this book.3.1.1.5 Drag
The term drag means to point to an item and hold down the left mouse button while you’re moving the mouse. You typically use dragging to move and size things on the screen. You can see examples a little later in this chapter.3.1.2 Keyboard terminology
It should go without saying that the computer keyboard is the thing that looks like a typewriter keyboard. The keys labeled F1, F2, and so forth across the top are function keys. The keys with arrows and names such as Home, End, PgUp (Page Up), and PgDn (Page Down) are navigation keys.3.1.2.1 Tab, Enter, and Spacebar
The Tab key has two opposing arrows pointing left and right. That key is usually to the left of the letter Q. The Enter key (also called the Return key) is located where the carriage return key is on a standard typewriter. It may be labeled Enter or Return, or it may just show a bent, left-pointing arrow. The Spacebar is the wide key centered at the bottom of the keyboard. When you’re typing text, it types a blank space.3.1.2.2 If in doubt, Escape key out
The Escape key is labeled Esc or Escape (or maybe even Cancel). It’s usually at the upper-left corner of the keyboard. It’s a good one to know because it often allows you to escape from unfamiliar territory.3.1.2.3 The Help key (F1)
The Help key is the F1 function key. That’s a good one to know because it’s the key you press for help. Not the kind of help where someone appears and helps you along. Unfortunately, it’s not possible to get that kind of help from a computer. Instead, pressing Help opens a help window.3.1.2.4 Windows key
If you have a Windows keyboard, you also have a Windows key, which shows the Windows logo. It’s usually near the lower-left corner of the keyboard. The Windows key might also show the word Start because you can tap it to show and hide the Windows 8 Start screen.3.1.2.5 Shift, Ctrl, and Alt
The keys labeled Shift, Ctrl (Control), and Alt (Alternate) are modifier keys. There are usually two of each of those keys on a keyboard, near the lower left and lower right of the main typing keys. The Shift key may be labeled with a large, up-pointing arrow. One Shift key is located to the left of the Z key, the other to the right of the question mark (?) key. They’re called modifier keys because they usually don’t do anything by themselves. Instead, you hold down a modifier key while pressing some other key. For example, when you hold down the Shift key and press the A key, you get an uppercase A rather than a lowercase a.3.1.2.6 Shortcut keys
The term press always refers to a key on the keyboard rather than something you do with the mouse. For example, the statement “Press Enter” means to press the Enter key. When you see an instruction to press two keys with a plus sign in between (key+key), that means “hold down the first key, tap the second key, release the first key.” For example, the instruction “Press Ctrl+Esc” means “Hold down the Ctrl key, tap the Esc key, release the Ctrl key.”You will see the following several times in this book: Press Windows+X while on the Windows desktop. This displays the Windows 8.1 Quick Link menu. It displays in the same location that the Start menu in previous versions of Windows (including Windows 7, Vista, XP, 98, and 95) displayed. The Quick Link menu includes several key menu options to help you locate system apps and programs, such as the Control Panel, Event Viewer, and so on.
You’ll often see the term shortcut key used to refer to key+key combinations. The “shortcut” part refers to the fact that the keystroke is an alternative way of doing something with the mouse. (It may not seem like much of a shortcut, however, if you can’t type worth beans!)
Much as we all hate to learn terminology, knowing the terms and keyboard keys we just described is critical to learning how to use a computer. All written and spoken instructions assume that you know what those terms mean. If you don’t, the instructions won’t do you any good.
Okay, let’s move on to using the computer and to the names of things you’ll do, see, and use often.
3.2 Logging In
Obviously, the first step to using a computer is to turn it on. Shortly after you first start your computer, the Windows 8 Lock screen appears (see Figure 3.2). To log in, slide the display up. To slide on a touch device, move your finger from the bottom of the display toward the top. With a mouse, click and drag the display toward the top, or press the spacebar. Windows displays the list of user accounts available on the device. You learn more about user accounts in Chapter 4, but for now, all you need to know is that if you see user account icons shortly after you first start your computer, you have to click one in order to use the computer. Tap (or click) on a user tile to enter the password for that user account, and then press Enter or tap (or click) the arrow icon to the right of the password field. If the user account isn’t password protected, the Windows Start screen appears automatically. If the user account you clicked is password protected, a rectangular box appears instead. You have to type the correct password for the account to get to the Windows Start screen. The letters you type won’t show in the box by default. Instead, you’ll see a dot for each letter you type, as in Figure 3.3. This prevents others from learning your password by looking over your shoulder as you type it on the screen. To temporarily see the characters you enter, press and hold the eye icon on the right side of the password box. This toggles on the characters so you can see that what you typed is what you intended to type.After you type the password, press Enter or click the arrow to the right of the password box.
After you’ve successfully logged in, the Windows Start screen appears.
3.3 Windows Start Screen
After you log on, you’ll see the Windows 8.1 Start screen, shown in Figure 3.4. The Start screen serves much the same function as the Start menu in previous versions of Windows. Square or rectangular tiles give you quick access to apps, external resources such as SkyDrive, folders, and even the desktop. The Start screen shows the look of the new Windows 8 interface. We don’t focus on the Start screen in this chapter because it was discussed in detail in Chapter 2.3.4 Using the Windows Desktop
The Windows desktop is the electronic equivalent of a real desktop. It’s the place where you keep stuff you’re working on right now. Every program that’s currently open is usually contained within some program window. When no programs are open, the desktop and all your desktop icons are plainly visible on the screen.3.4.1 What’s on the desktop
Users upgrading from previous Windows versions are familiar with the Windows desktop, the primary place for users to start their work in earlier versions of Windows. You work with programs on the Windows desktop in much the same way you work with paper on an office desktop. With Windows 8.1, the Start screen is intended to replace the desktop as the primary work environment. However, the Windows desktop is still very much a part of Windows, and it’s the environment in which you run legacy Windows applications. The desktop is accessed from the Start screen by clicking the Desktop tile. The desktop may get covered by program windows and other items, but the desktop is still under there no matter how much you clutter the screen. It’s the same as a real desk in that sense. Although your real desktop may be completely covered by random junk, your desktop is still under there somewhere. You just have to dig through the mess to get to it.The two main components of the Windows desktop are the desktop itself and the taskbar. The desktop is where everything that you open piles up. The taskbar’s main role is to make it easy to switch from one open item to another. Everything you’ll ever see on your screen has a name and a purpose. Virtually nothing on the screen is there purely for decoration (except the wallpaper). Figure 3.5 shows the main components of the Windows desktop and other items. Your desktop might not look exactly like the picture and might not show all the components. But don’t worry about that. Right now, you want to focus on learning the names of the most frequently used elements.
Here’s a quick overview of what each component represents.
- Desktop: The desktop itself is everything above the taskbar. Most programs you open appear in a window on the desktop.
- Desktop icons: Icons on the desktop provide quick access to frequently used programs, folders, and documents. You can add and remove desktop icons as you see fit.
- Quick Link menu: The Quick Link menu provides access to commonly used Windows programs and apps. To see it, right-click the Start button at the bottom-left side of the screen, or press Windows+X.
- Taskbar: A task is an open program. The taskbar makes switching among all your open programs easy. Right-clicking the clock in the taskbar provides easy access to options for customizing the taskbar and organizing open program windows.
- Notification area: Displays icons for programs running in the background, often referred to as processes and services. Messages coming from those programs appear in speech balloons just above the notification area.
- Clock: Shows the current time and date.
That’s the quick tour of items on and around the Windows 8.1 desktop. The sections that follow examine some of these items in detail.
3.4.2 About desktop icons
Desktop icons represent a closed object that you can open by double-clicking the icon. Most desktop icons are shortcuts to files and folders. They’re shortcuts in the sense that they duplicate icons that are available elsewhere, such as on the Start screen.Rules always have exceptions. When it comes to desktop icons, the Recycle Bin is the exception. The Recycle Bin icon exists only on the desktop, and you won’t find it anywhere else. The role of the Recycle Bin is that of a safety net. Whenever you delete a file or folder from your hard drive, the item is actually just moved to the Recycle Bin. You can restore an accidentally deleted item from the Recycle Bin back to its original location.
In addition to the Recycle Bin, you have other built-in desktop icons from which to choose. If you want to take a shot at adding icons, you have to get to the Personalization page and make some selections. To get to the Personalization page, use one of the following methods:
- Show the charms, click Search, and type pers. Click Settings and then click Personalization on the Settings screen.
- Right-click the desktop and choose Personalize.
The Personalization Control Panel applet opens. In its left column, click Change Desktop Icons. You see a dialog box like the one in Figure 3.6. It’s called a “dialog” box because you carry on a sort of dialog with it. It shows you options from which you can pick and choose. You make your choices and click OK. You’ll see menu dialog boxes throughout this book.To make an icon visible on your desktop, select (click to put a check mark in) the check box next to the icon’s name. To prevent an icon from appearing on the desktop, click the check box to the left of its name to deselect it (remove the check mark). In the figure, we’ve opted to show just the Recycle Bin.
You can choose a different picture for any icon you’ve opted to show on the desktop. Click the icon’s picture in the middle of the dialog box. Then click the Change Icon button. Click the icon you want to show and then click OK. If you change your mind after the fact, click Restore Default.
Click OK after making your selections. The dialog box closes, and the icons you choose appear on the desktop. However, you might not see them if that part of the desktop is covered by something that’s open. Don’t worry about that. You learn about how to open, close, move, and size things on the desktop a little later in this chapter.
If nothing is covering the desktop, but you still don’t see any desktop icons, they might just be switched off. We cover this topic in the next section.
3.4.2 About desktop icons
As you discover in Chapter 10, there are many ways to customize the Windows 8 desktop. But if you just want to make some quick, minor changes to your desktop icons, right-click the desktop to view its shortcut menu. Items on the menu that have a little arrow to the right show submenus. For example, if you right-click the desktop and point to View on the menu, you see the View menu, as shown in Figure 3.7.The last item on the View menu, Show Desktop Icons, needs to be selected (checked) for the icons to show at all. If no check mark appears next to that item, click the item. The menu closes, and the icons appear on the desktop. When you need to see the menu again, just right-click the desktop again.
The top three items on the menu — Large Icons, Medium Icons, and Small Icons — control the size of the icons. Click any option to see its effect. If you don’t like the result, right-click the desktop again, choose View, and choose a different size.
3.5 Using Jump Lists
Jump lists were a new feature of Windows 7 that enhance the usefulness of the icons and pin items on the taskbar. Windows 8.1 continues to use Jump Lists. Jump Lists add the most recently used objects from the application to a pop-up menu. Just right-click the icon to view the Jump List (see Figure 3.8).You don’t need to do anything to set up Jump Lists — they happen automatically. Whenever you want to use a Jump List, just right-click a taskbar icon and choose from the list the item you want to open.
Комментариев нет:
Отправить комментарий