
After you master basic Mac spell-casting — selecting items, using menus, opening and saving documents, working with windows, launching an application or two, and the like — it’s time to delve deeper into OS X.
In this chapter, I discuss file management, showing you the hidden power behind the friendly Apple menu (•). I also discuss some of the more advanced menu commands, how to print in most applications, and how to listen to an audio CD on your Mac. (It makes a doggone good stereo, especially with a good set of external speakers.) Finally, I introduce you to the built-in CD/DVD recording features in the Big X and show you how to add a standard USB printer to your system.

So what exactly is Finder anyway? It’s a rather nebulous term, but in essence, Finder gives OS X the basic functions that you’ll use for the procedures I outline in this chapter. This über-OS has been around in one guise or another since the days of System 6 — the creaking old days when a Mac was an all-in-one computer with a built-in screen. Come to think of it, some things never change (as I glance at my iMac).
Finder is always running, so it’s always available — and you can always switch to it, even when several other applications are open and chugging away. Figure 3-1 illustrates the Dock with the rather perspective-crazy Finder icon at the far left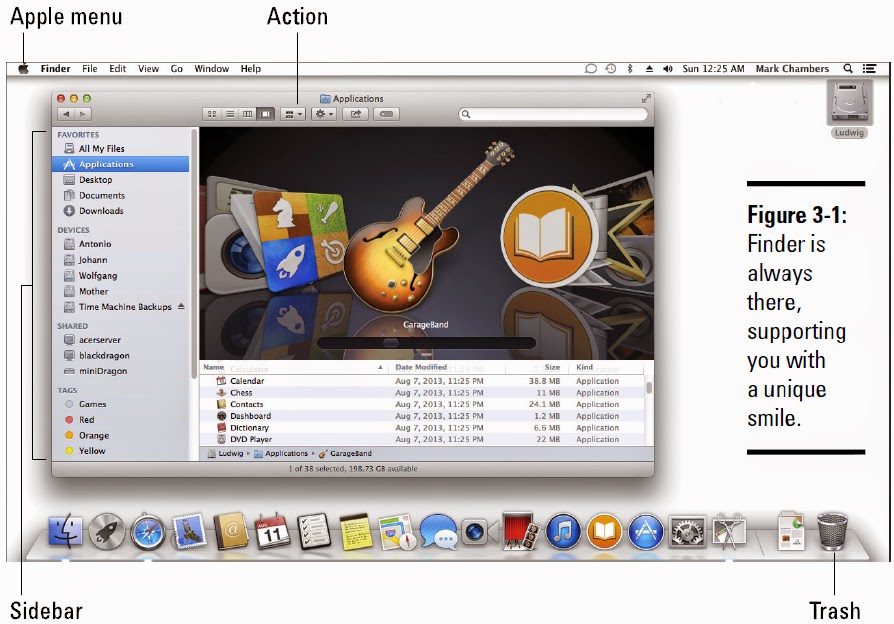
Is that icon supposed to be one face or two faces? I’m still confused, and I’ve been using the Mac now since 1989.
Don’t forget that OS X gives you a second method of doing everything I cover in this chapter: You can use Terminal to uncover the text-based Unix core of OS X, employing your blazing typing speed to take care of things from the command line. Of course, that’s not the focus of this book, but for those who want to boldly go where no Mac operating system has gone before, you’ll find more in Book VIII, Chapter 2. Despite what you might have been led to believe, power and amazing speed are to be found in character-based computing.

Here’s where drag-and-drop makes things about as easy as computing can get:
✦ To copy a file or folder from one window to another location on the same drive: Hold down the Option key and click and drag the icon from its current home to the new location. (Note: You can drop files and folders on top of other folders, which puts the copy inside that folder.) If you’re copying multiple items, select them first (read how in Chapter 2 of this minibook) and then drag and drop the entire crew.
“Is the Desktop a valid target location for a file or folder?” You’re darn tootin’! I recommend, though, that you avoid cluttering your Desktop with more than a handful of files. Instead, create a folder or two on your Desktop and then store those items in those folders. If you work with the contents of a specific folder often, drag it into the Favorites heading in the sidebar (the column on the left side of any Finder window), and you can open that folder from Finder with a single click — no matter where you are! (Alternatively, drag the folder to the right side of the Dock and drop it there, and you can open it with a single click from anywhere.)
✦ To copy items from one window to a location on another drive: Click and drag the icon from the window to a window displaying the contents of the target drive. Or, in the spirit of drag-and-drop, you can simply drag the items to the drive icon, which places them in the root folder of that drive.
✦ To move items from one window to another location on the same drive: Simply drag the icon to the new location, whether it be a window or a folder. (To move items to a different drive, hold down the • key while dragging.)
OS X provides you with a number of visual cues to let you know what’s being copied or moved. For example, dragging one or more items displays a ghost image of the items. When you’ve positioned the cursor over the target, OS X highlights that location to let you know that you’re in the zone. If you’re moving or copying items into another Finder window, the window border is highlighted to let you know that OS X understands the game plan.
In case you move the wrong thing or you port it to the wrong location, press •+Z to undo the previous action.
If the item that you’re dragging already exists in the target location, you get a confirmation dialog like the one you see in Figure 3-2. You can choose to replace the file, leave the existing file alone, keep both files, or stop the entire shooting match. (If you decide to keep both, OS X appends a numeric string to the new arrival’s filename.)

No need for sci-fi equipment or billions in cash — you can create a duplicate of any item in the same folder. This technique is often handy when you need a simple backup of the same file in the same folder or when you’re going to edit a document but you want to keep the original intact.
Click the item to select it and then choose File➪Duplicate (or use the keyboard shortcut and press •+D). To distinguish the duplicate from the original, OS X adds the word copy to the end of the duplicate’s icon name; additional copies have a number added to the name as well.
Alternatively, drag-and-drop aficionados might want to hold down the Option key and drag the original item to another spot in the same window. When you release the button, the duplicate appears.
Heck, if you prefer the mouse (or trackpad), you can right-click the item and then choose Duplicate from the contextual menu that appears. Decisions, decisions. . . .
Oh, and don’t forget that Action button on the Finder toolbar (labeled in Figure 3-1). You can also click the Action button and choose Duplicate from the pop-up menu.
When you duplicate a folder, OS X automatically duplicates all the contents of the folder as well. Remember that this process could take some time if the folder contains a large number of small files (or a small number of large files).

Even Leonardo da Vinci made the occasional design mistake. No doubt, his trash can was likely full of bunched-up pieces of parchment. Luckily, no trees will be wasted when you decide to toss your unneeded files and folders; this section shows you how to delete items from your system.
By the way, as you’ll soon witness for yourself, moving items to the Trash doesn’t necessarily mean that they’re immediately history.
In OS X, the familiar Trash icon (a spiffy-looking wire can) appears on the right edge of the Dock. (Did you expect anything less from Mavericks?) You can click and drag the items that you’ve selected to the Trash and drop them on top of the wire can icon to delete them. When the Trash contains at least one item, the wire can icon changes to appear as if it were full of trash.
You can also add a Delete icon to your Finder toolbar. For all the details, see Book II, Chapter 1.
The mouse isn’t the only option when deleting items. Your other options for scrapping selected files include
✦ Choosing File from the Finder menu and choosing the Move to Trash menu item
✦ Pressing the •+Delete keyboard shortcut
✦ Clicking the Action button on the Finder toolbar and choosing Move to Trash from the pop-up menu
✦ Right-clicking the item to display the contextual menu and then choosing Move to Trash from that menu

As I mention earlier, moving items from your Mac’s hard drive to the Trash doesn’t delete them immediately from your system. Believe me, this fail-safe measure comes in handy when you’ve been banging away at the keyboard for several hours and you stop paying close attention to what you’re doing. (I usually also blame the lack of Diet Coke.) More on how to rescue files from the Trash in the next section. If you connect to other computers and servers across your network, however, take heed: Moving items that reside on another computer to the Trash will display a warning dialog that the items will be immediately (and permanently) deleted.
As you can with any folder, you can check the contents of the Trash by clicking its icon on the Dock.
After you double-check the Trash contents and you’re indeed absolutely sure that you want to delete its contents, use one of the following methods to nuke the digital Bit Bucket:
✦ If the contents of the Trash are still displayed in a Finder window, click the Empty button at the upper right of the window.
✦ Choose the Empty Trash menu item from the Finder menu.
✦ Choose Secure Empty Trash from the Finder menu.
Believe it or not, if you use the standard Empty Trash command, you still haven’t zapped that refuse! Some third-party hard drive repair and recovery programs will allow an uncool person to restore items from the Trash. Comparatively, use the Secure Empty Trash method for those sensitive files and folders that you want to immediately and irrevocably delete. The data is overwritten with random characters, making it impossible to recover without resorting to your backup. (A great idea for that Mac you want to sell on eBay, no? If you like, you can reinstall OS X before you ship the Mac, leaving the Setup Assistant ready-to-run for the new owner.)
✦ Press the •+Shift+Delete keyboard shortcut.
✦ Click the Trash icon on the Dock, hold down the mouse button, and choose Empty Trash from the menu that appears.
✦ Right-click the Trash icon on the Dock and then choose Empty Trash from the contextual menu that appears.
Depending on the method you select and the settings you choose in System Preferences (which I cover in Book II, Chapter 3), OS X might present you with a confirmation dialog to make sure that you want the Trash emptied.

In the adrenaline-inducing event that you need to rescue something that shouldn’t have ended up in the scrap pile, first click the Trash icon on the Dock to display the contents of the Trash. Then rescue the items that you want to save by dragging them to the Desktop or a folder on your hard drive. (This is roughly analogous to rescuing your old baseball glove from the family garage sale.) You can also right-click any item in the Trash and choose Put Back from the menu that appears.
Feel free to gloat. If someone else is nearby, ask him or her to pat you on the back and call you a lifesaver.

You wouldn’t get far in today’s spacious virtual world without being able to change a moniker for a file or folder. To rename an item in OS X, use one of these methods:
✦ With the mouse or trackpad: Click once on an icon’s name to highlight it, and then click the name again or press Return. OS X highlights the text in an edit box. Type the new name and then press Return when you’re done. You want to wait a few seconds between clicks, as opposed to doing a rapid-fire double-click.
✦ From the Info dialog: Select the item and press •+I to display the Info dialog; then click the triangle next to Name & Extension. Click in the name field, drag the mouse to highlight the text that you want to change, and type the replacement text.
Naturally, the first method is the easiest, and it’s the one that I use most often.

In Mavericks, you can color-code files and folders to help you organize and recognize your data in a hurry using the Finder Tags feature. For example, why not assign the green Tag color to the files and folders that make up your current project? Or, if you need to mark a file for immediate attention, assign it the red Tag color.
To assign a Tag color to selected files and folders, you have five options:
To assign a Tag color to selected files and folders, you have five options:
✦ Choose a Tag when you save a document.
✦ Assign a Tag in the Info and Inspector dialogs (which I’ll discuss in a page or two).
✦ Click the Action button on the Finder toolbar and then click the desired Tag.
✦ Right-click the selection and then choose the color from the pop-up menu.
✦ From the File menu, choose that perfect shade from the menu.
Finder prompts you for a keyword when you create a new Tag, which is a great help when organizing your files and folders.
After you create at least one Tag, you’ll notice that they are displayed in the Finder sidebar under the Tags heading. A single click on the Tag name in the sidebar displays all files with that Tag. Because Tags work in both your local drive and your iCloud Library, you can create documents using different applications and view them all at once, even if they’re spread out in different locations and folders! You can also apply more than one Tag to an item.
You can search for items with specific Tags in the Spotlight search box, too — click in the Search box in any Finder window and type the Tag keyword or color. (From the Desktop, click the magnifying glass icon at the upper right corner of your Desktop and type the Tag keyword or color.) For more information on searching with Spotlight, flip to the next chapter.
You can search for items with specific Tags in the Spotlight search box, too — click in the Search box in any Finder window and type the Tag keyword or color. (From the Desktop, click the magnifying glass icon at the upper right corner of your Desktop and type the Tag keyword or color.) For more information on searching with Spotlight, flip to the next chapter.
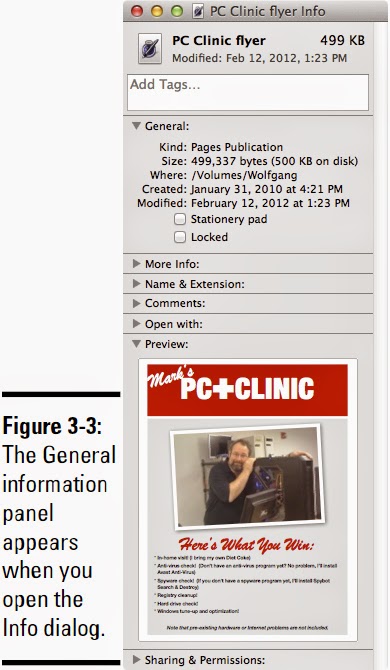 Finder’s Info dialog is the place to view the specifics on any highlighted item (including drives and aliases). You can display the Info dialog in a number of ways: Select an item and press •+I, click the Action toolbar button and then select Get Info from the menu; right-click the item and choose Get Info; or open Finder’s File menu and then choose Get Info. (See the results in Figure 3-3.) If you select more than one item, Mavericks opens a separate Info dialog for each item.
You can also show an Info dialog that summarizes multiple items, and this is A Good Thing if you need to see the total size for several files or folders. To display the Summary Info dialog, select the desired items, hold down the Control key, and choose File➪Get Summary Info. (Yep, in case you were wondering, some of the items on the File menu do change when you hold down Control. Display the File menu and try it yourself!)
There’s yet another species of the Info dialog: Inspector displays the same data as the Summary Info dialog, but it’s automatically updated when you click a different file or folder! (This feature is a great convenience if you’re checking the information on a number of separate items in different locations on your MacBook.) To display Inspector, press •+Option+I.
OS X displays the General information panel when you first open the Info dialog, but other panels are usually available (depending on the type of selected items).
For most types of files and folders, the Info dialog can tell you the following:
✦ Kind: What type of item it is — for example, whether it’s a file, folder, drive, or alias
✦ Open With: What program launches automatically when you open the selected item
✦ Size: The total size of the item (or items, if there are more than ten) that you select
✦ Where: The path on your hard drive where the item is located
✦ Dates: When the item was created and was last modified
✦ Version: The application version number
✦ Name & Extension: The file’s name and extension
✦ Tags: Any Finder Tags you’ve assigned to the item
✦ Sharing & Permissions: The privileges that control who can do what to the file (more on this later, in Book II, Chapter 6) and whether a file is locked in read-only mode
Some of this information you can change, and some can only be displayed. To banish the Info dialog from your Desktop, click the dialog’s Close button. You can hide or display various parts of the Info dialog by clicking the triangles next to each section heading.
For the rest of this section, I describe a number of tasks that you can accomplish from the Info dialog.
For the rest of this section, I describe a number of tasks that you can accomplish from the Info dialog.
If you use a specific document over and over as a basis for different revisions, you can enable the Stationery Pad check box on the General information panel to use the file as stationery. Opening a stationery file automatically creates a new, untitled version of the file in the linked application, which can save you steps compared with duplicating the file.

OS X provides you with a Spotlight Comments field in the Info dialog and Inspector, where you can add additional text that’s stored along with the file (and can be matched with Spotlight). I use this feature to record the version number of manuscript chapters and programs that I create during the course of writing books.
To add a comment, follow these steps:
To add a comment, follow these steps:
1. Display the Info dialog for the item by pressing •+I or choosing File➪Get Info.
2. Click in the Comments box and type the comment text.
If you need to expand the Comments section of the Info dialog, click the triangle next to the Comments heading. The arrow rotates, and the Comments box appears.3. Close the Info dialog to save the comment.

File extensions are alien creatures to most Mac owners. However, these (usually) three- or four-character add-ons that follow a period at the end of a filename have been a mainstay in character-based operating systems like Unix for years. A file extension identifies what program owns a specific file, and therefore which application launches automatically when you doubleclick that file’s icon. Examples of common extensions (and the applications that own them) include
✦ .pdf: Preview, or Adobe Acrobat
✦ .doc or .docx: Microsoft Word
✦ .pages: Apple Pages
✦ .key: Apple Keynote
✦ .psd: Adobe Photoshop or Photoshop Elements
✦ .jpeg or .jpg: Preview, or your image editor
✦ .tiff or .tif: Preview, or your image editor
✦ .htm or .html: Safari, or your web browser of choice
Why would someone want to see a file’s extension? It comes in handy when a number of different types of files are linked to the same application. For example, both JPEG and TIFF images are displayed as thumbnails in a Finder window, so it’s sometimes hard to tell one from the other. With extensions displayed, it’s easy to tell what type of file you’re looking at.
Follow this procedure to hide or display extensions with your filenames:
Follow this procedure to hide or display extensions with your filenames:
- Display the Info dialog for the item by pressing •+I or choosing File➪Get Info.
- If you need to expand the Name & Extension section of the Info dialog, click the triangle next to the Name & Extension heading.
- To display the extension for the selected file, clear the Hide Extension check box to disable it.
- Close the Info dialog to save your changes.
So what’s the plan if the wrong application launches when you double-click a file? Not a problem: You can also change the linked application from the Info dialog as well. (I told you this was a handy tool box, didn’t I?) Follow these steps to choose another application to pair with a selected file:
1. Click the Action button on the Finder toolbar and then click Get Info to display the Info dialog for the item.
2. Click the triangle next to the Open With heading to expand it.
3. Click the pop-up menu button.
OS X displays the applications that it feels are best suited to open this type of document.4. Select the application that should open the file.
To go completely hog wild and choose a different application, select Other from the Open With pop-up menu. OS X displays a Choose Other Application dialog, where you can navigate to and select the application you want. (If the application isn’t recognized as recommended, open the Enable pop-up menu and choose All Applications.) After you highlight the application, select the Always Open With check box and click the Add button.
If you don’t have an application that can open a specific file type, you can also opt to search the App Store for an application you can purchase to open it. Just choose App Store from the Open With pop-up menu. (A sometimes pricey option, of course, but certainly convenient!)
5. To globally update all the documents of the same type to launch the application that you chose, click the Change All button.
OS X displays a confirmation dialog asking whether you’re sure about making this drastic change. Click Continue to update the other files of the same type or click Cancel to return to the Info dialog.6. Close the Info dialog to save your changes.

“Holy Item Insurance, Batman!” That’s right, Boy Wonder: Before I leave the friendly land of the Info dialog, every Mac owner needs to know how to protect files and folders from accidental deletion or editing. By locking a file, you allow it to be opened and copied — but not changed, renamed, or sent to the Trash. Locked items appear in Finder with a small padlock attached to the icon.
To lock or unlock a file, you have to have ownership of the file. I cover privileges in Book II, but on a Mac where you’ve configured only one administrator account, you should already have ownership.
If you’re considering changing the ownership of a system-owned file, don’t do it. You could throw a serious monkey wrench into your Mavericks system.
To lock a file, follow this procedure:
1. Display the Info dialog for the item.
2. Select the Locked check box.
Find the Locked check box in the General section of the dialog. (Refer to Figure 3-3.)3. Close the Info dialog to save your changes.
Комментариев нет:
Отправить комментарий