
✦ From the Finder menu, choose File➪Make Alias. You have to move the alias yourself.
✦ Press the •+L keyboard shortcut. Again, you have to move the new alias to its new location.
✦ Click the Action button on the Finder toolbar and then click Make Alias.In addition, you can hold down the •+Option key combination and drag the item to the location where you want the alias.
✦ Right-click the selected item and then choose Make Alias from the contextual menu that appears.
Although OS X does a great job in tracking the movements of an original and updating an alias, some actions can break the link. For example, if you delete the original, the alias is left wandering in search of a home. However, all is not lost. When you double-click a broken alias, OS X offers to help you fix the alias. This involves browsing through your system to locate a new original.


 If you’re like most of us — and I think I’m safe in assuming that you are — you tend to work on the same set of applications and files (and use the same network servers) during the day. Even with features such as Mission Control, Launchpad, and Stacks, you’ll sometimes find yourself drilling down through at least one layer of folders to reach the stuff that you need. To make things easier on yourself, you could create a set of aliases on your Desktop that link to those servers, files, and applications . . . but as you move from project to project, you’d find yourself constantly updating the aliases. As Blackbeard the Pirate was wont to exclaim, “Arrgh!”
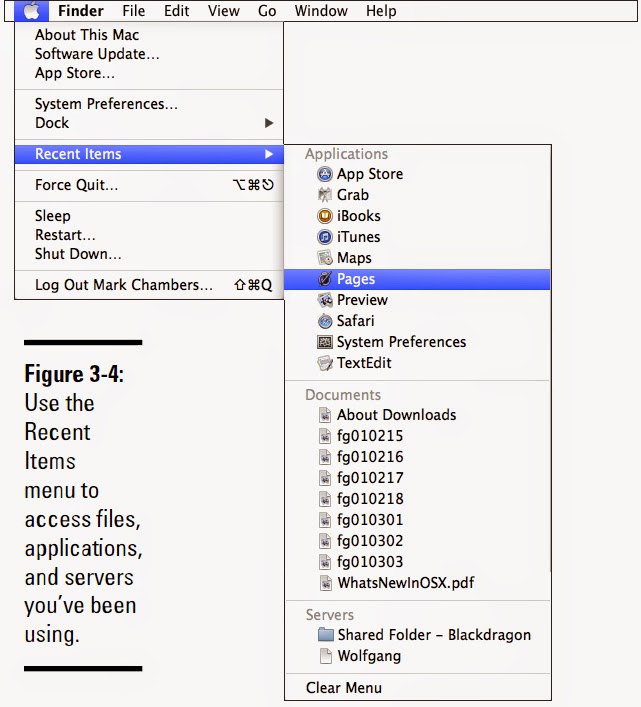
Ah, but OS X is one right-smart operating system, and several years ago, Apple created the Recent Items menu to save you the trouble of drilling for applications and files (and even network servers as well). Figure 3-4 illustrates the Recent Items menu from my system. Note that the menu is thoughtfully divided into Applications, Documents, and Servers. When you open documents or launch applications, they’re added to the list. To launch an application or document from the Recent Items menu — or connect to a network server — just click it.
To wipe the contents of the Recent Items menu — for example, if you’ve just finished a project and want to turn over a new digital leaf — click Recent Items and choose the Clear Menu item.
You can specify the number of recent items that will appear in the menu from System Preferences; display the General pane and click the list box next to the Recent Items field. (More on this in Book II, Chapter 3.)
Also, remember the trick that I mention earlier: You can drag any folder or server into the sidebar column at the left of a Finder window, adding it to that exclusive club that includes your Home folder, Applications folder, and media folders.

If you want your Dock to go mobile as well, click the Apple menu (•) and choose the Dock item to display the submenu. Here’s a rundown of the options that you’ll find:
✦ Hiding: Click Turn Hiding On/Off to toggle the automatic hiding of the Dock. With hiding on, the Dock disappears off the edge of the screen until you move the cursor to that edge. (This feature is great for those who want to make use of as much Desktop territory as possible for their applications.)
You can press •+Option+D to toggle Dock hiding on and off from the keyboard.
✦ Magnification: Click Turn Magnification On/Off to toggle icon magnification when your cursor is selecting an icon from the Dock. With magnification on, the icons on the Dock get really, really big . . . a good thing for Mr. Magoo or those with grandiose schemes to take over the world. Check out the rather oversized icons in Figure 3-5. (You can control the amount of magnification from the System Preferences Dock settings, which I explain in Book II, Chapter 3.)
✦ Position: Click one of three choices (Position on Left, Bottom, or Right) to make the Dock appear on the left, bottom, or right of the screen, respectively.
✦ Dock Preferences: Click this option to display the System Preferences Dock settings, which I explain in Book II, Chapter 3.


 Once in a while, you’ll encounter a stubborn application that locks up, slows to a crawl, or gets stuck in an endless loop. Although OS X is a highly advanced OS, it can still fall prey to bad programming or corrupted data.
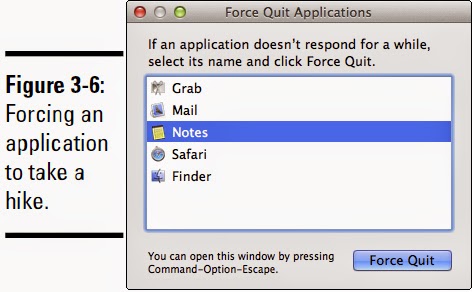
Luckily, you can easily shut down these troublemakers from the Apple menu. Just choose Force Quit to display the Force Quit Applications dialog that you see in Figure 3-6. (Keyboard types can press •+Option+Esc.) Select the application that you want to banish and then click the Force Quit button; OS X requests confirmation, after which you click the Force Quit button again.
If you select Finder in the Force Quit Applications dialog, the button changes to Relaunch. This allows you to restart Finder, which comes in handy if your system appears to be unstable. This technique is much faster than restarting your Mac.
Forcing an application to quit will also close any open documents that you were working in that application, so save your work beforehand (if the program will allow you to save anything). This is not a good time to rely solely on the Resume feature, which may not work correctly if an application has locked up. If you relaunch Finder, some programs might restart as well.

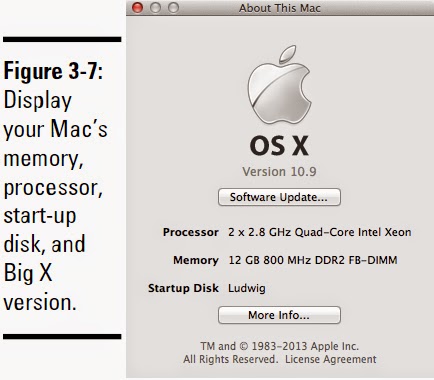 If you choose About This Mac from the Apple menu, OS X displays the About This Mac dialog that you see in Figure 3-7 (in this example, proudly displaying my Mac Pro supercomputer). When you need to check the amount of memory or the processor in an unfamiliar Mac, the About This Mac dialog can display these facts in a twinkling. However, I primarily use it to check the OS X version and build number as well as to launch the Apple System Information utility (which I discuss in full in Chapter 9 of this minibook). Click the More Info button to launch System Information.
Apple allows you to launch Software Update from three spots: the About This Mac dialog, the System Preferences window, and the Apple menu. Sheesh, they must really want you to keep your Big X up to date, I guess.

Along the top of the App Store window, you’ll see a number of toolbar buttons that let you jump directly to Apple’s featured titles, as well as lists of the applications you’ve already purchased and a list of the software you’ve bought that needs updating.
When you locate the perfect application for your needs, click the price button to purchase the app. It’s automatically downloaded to your Mac, and the App Store even adds an icon to your Launchpad so that you can try out your new software. You can install your App Store purchases on all of your Macs (using the same Apple ID), without having to buy additional copies or licenses. Leave it to Apple to Do Things the Right Way.

A location saves all the specific values that you’ve entered in the System Preferences Network settings, including IP address, DNS servers, and proxy servers. If all this means diddly squat to you, don’t worry; I explain it all in Book VI, Chapter 1. For now, just remember that you can switch between locations by choosing Location from the Apple menu, which displays a submenu of locations that you can choose among. You must, though, create at least a second location for the Location menu item to appear in the Apple menu. Makes sense, right?

Availing Yourself of OS X Services
In OS X, Services allow you to merge information from one application with another. To Mac old-timers, Services might sound suspiciously like the Clipboard; however, Services can also include functionality from an application, so you can create documents or complete tasks without running another program. Services can be used in both the Finder and OS X applications.To illustrate, here’s a fun example:
1. Launch TextEdit from Launchpad and type your name.After you’ve shaken your head at all the sites devoted to people with the same name, consider what you just did — you ran the Safari application from TextEdit, using selected words! Pretty slick, eh?
2. Highlight your name.
3. Click the TextEdit menu — don’t switch to Finder; use the TextEdit application menu — and choose Services.
4. From the Services submenu, choose Search with Google.
A glance at the other Services that show up in most applications gives you an idea of just how convenient and powerful OS X Services can be. I often use Services to take care of things such as
✦ Sending an e-mail message from an e-mail address in a text file or Contacts (via the Mail Service)
✦ Capturing a screen snapshot in an application (using the Capture Selection from Screen Service)
✦ Sending a file to a Bluetooth-equipped tablet or cellphone in an application (using the Send File to Bluetooth Device service)
At the time of this writing, you can’t use this Bluetooth file transfer feature with an iPhone, iPod touch, or iPad.
You can access the Services menu from an OS X application by selecting that program’s application menu (sometimes called the named menu). For instance, in the demonstration earlier, I use the TextEdit menu that appears on the TextEdit menu bar. In Microsoft Word, I would click the Word menu.
Geez, I think the computing world needs another word for menu — don’t you?
Many third-party applications that you install under OS X can add their own commands under the Services menu, so be sure to read the documentation for a new application to see what Services functionality it adds.
You can enable or disable menu items from the Services menu. For example, the Send File to Bluetooth Device service that I mention earlier is turned off by default. To make changes to your Services, display the Services menu from the Finder menu bar and choose Services Preferences. Mavericks displays the Services list in the Keyboard pane of System Preferences, and you can toggle the display of a service by selecting the check box next to it.
Finder’s Go menu gives you the chance to play Captain Kirk: You can jump immediately to specific spots, both within the confines of your own system as well as external environments, such as your network or the Internet. (You can leave your phaser and tricorder in your cabin.)
The destinations that you can travel to using the Go menu are
✦ Back/Forward/Enclosing Folder: I lump these three commands together because they’re all basic navigation commands. For example, Back and Forward operate just as they do in Safari or your favorite web browser. If you’re working in a folder, you can return to the parent folder by clicking Enclosing Folder.
✦ All My Files: This window displays all the documents you’ve created or added, such as word-processing documents, images, and movies.
✦ Documents: Yep, you guessed it: This window displays the contents of your Documents folder.
✦ Desktop: This window displays the files and folders that you’ve stored on your Mavericks desktop.
✦ Downloads: Here, you’ll find the contents of your Downloads folder.
✦ Home: This window displays the home directory for the user currently logged in.You can also type the path for a specific folder (use the Go to Folder command) or connect to a specific network server (use the Connect to Server command).
✦ Library: This window displays the contents of the Library folder for the user currently logged in. (The Library folder is located in the user’s home directory but is hidden by default.) The Library entry in the Go menu appears only when you hold down the Option key.
✦ Computer: This window includes your hard drives, CD and DVD drives, and your network — the same places that appear when you open a new Finder window with the •+N key shortcut.
✦ Network: Did you guess that this window displays a window with all your network’s servers? Dead giveaway, that.
✦ Applications: This window includes all the applications that appear in your OS X Applications folder (a neat Just the programs, ma’am arrangement that really comes in handy).
✦ Utilities: This window displays the contents of your OS X Utilities folder.
✦ Recent Folders: This window displays a submenu that allows you to choose among the folders that you’ve recently opened.
Note that most of the Go menu commands include keyboard shortcuts, proving once again that the fingers are quicker than the mouse.


To quickly change the audio volume level in OS X, click the Volume icon (it looks like a speaker with emanating sound waves) to display its slider control; then click and drag the slider to adjust the level up or down. After you select a level by releasing the mouse button, your Mac thoughtfully plays the default system sound to help you gauge the new volume level.
Depending on the functionality that you’re using with OS X, these other menu bar icons might also appear:
✦ Modem status: You can turn on the display of the Modem status icon from the corresponding modem panel on the Network pane in System Preferences, which I discuss in Book II, Chapter 3. The icon can be set to show the time that you’ve been connected to the Internet as well as the status of the connection procedure. (Naturally, your Mac will need a Mavericks–compatible external USB modem to use this status icon.)
✦ Wi-Fi: Because your Mac is equipped with an AirPort or AirPort Extreme card, you can enable the Show Wi-Fi Status in Menu Bar check box in System Preferences. To do so, click the Network icon and then choose your Wi-Fi connection in the column at the left. The Wi-Fi status icon displays the status of the connection; click the Wi-Fi icon to toggle your wireless hardware on or off. The icon displays the relative strength of your Wi-Fi signal, whether you’re connected to a Base Station or a peer-to-peer computer network, or whether Wi-Fi is turned off. You can also switch between multiple Wi-Fi networks from the menu.
✦ Sync: If an iOS device is connected to your Mac and you sync the device, you’ll see a rotating circle while the sync is in progress.
✦ Bluetooth: You can toggle Bluetooth networking on or off. You can also make your Mac discoverable or hidden to other Bluetooth devices, send a file to a Bluetooth device, or browse for new Bluetooth devices in your vicinity. Additionally, you can set up a Bluetooth device that’s already recognized or open the Bluetooth pane in System Preferences. (If you don’t see the angular Bluetooth icon in your menu bar, display the Bluetooth pane in System Preferences and make sure the Show Bluetooth Status in the Menu Bar check box is enabled.)
✦ Messages: You can monitor and change your online/offline status from the Messages menu bar icon, as well as check which of your Messages Buddies are online. You can also choose to compose a new message, which automatically launches Messages for you. This icon only appears if you launch Messages; choose Messages➪Preferences, and select the Show Status in Menu Bar check box on the General pane.
✦ Time Machine: If you’re using Time Machine to back up your Mac automatically, this icon displays the date of your last backup. You can also manually start a backup from the menu bar icon. To display the icon, open System Preferences and click the Time Machine icon; then select the Show Time Machine Status in the Menu Bar check box.
✦ Open/Close SuperDrive: If your Mac is equipped with a SuperDrive optical drive, click this icon (which bears the same familiar Eject symbol as your keyboard) to eject the disc.
✦ PPPoE: The display of this icon is controlled from the PPPoE settings on the Network pane in System Preferences. Click this icon to connect to or disconnect from the Internet using Point-to-Point Protocol over Ethernet (PPPoE), which is a type of Internet connection offered by some digital subscriber line (DSL) providers.

You can even open the System Preferences Date & Time settings from the icon. From the Date & Time settings, you can choose whether the seconds or day of the week are included, the separators should flash, or OS X should display the time in 24-hour (military) format. More on this in Book II, Chapter 3.

Just to keep things clear, I should point out that we’re talking hardware devices here, so static and removable volumes have nothing to do with the sound volume control on your menu bar.
I won’t discuss loading/mounting a removable volume. The process differs depending on the computer because some Macs need a button pushed on the keyboard, others have buttons on the drive itself, and some drives have just a slot with no button at all. However, there are a number of standard ways of unloading/unmounting/ejecting a removable volume:
✦ Drag the volume’s icon from the Desktop to the Trash, which displays an Eject pop-up label to help underline the fact that you are not deleting the contents of the drive. Let me underline that with a Mark’s Maxim because switchers from the Windows world are usually scared to death by the concept of dragging a volume to the Trash.You can’t unmount a static volume from the Desktop — you have to use the Disk Utility application — so your internal hard drive icon will stay where it is.
Have no fear. In the Apple universe, you can drag removable volumes to the Trash with aplomb.
✦ Click the volume’s icon and use the •+E keyboard shortcut.
✦ With the volume open in a Finder window, click the Action button and choose Eject from the pop-up menu.
✦ Choose File➪Eject.
✦ Click the Eject button next to the device in the Finder window sidebar.
✦ Right-click the volume’s icon to display the contextual menu; then choose Eject.
✦ Click the Eject icon on the Finder menu bar to eject a CD or DVD from your optical drive.
✦ Press your keyboard Eject key (if it has one) to eject a CD or DVD from your built-in optical drive. (If you’re using a keyboard without a Media Eject key, press and hold F12 instead.)


Okay, I admit it — this section is a grab bag of three common tasks: working with text files, listening to an audio CD, and recording a data CD. I present these three procedures here because I want to walk you through them early in the book. Mac owners with an internal or external optical drive will likely want to listen to and record CDs as soon as they start using Mavericks, and you’d be amazed how much information still flows across the Internet in plain, simple text.
Therefore, hang around and take care of business.

✦ Information files on the Internet, such as FAQs (Frequently Asked Questions files)
✦ README and update information by software developers
✦ Swapping data between programs, such as comma- and tab-delimited database files
Here’s the quick skinny on opening, editing, and saving an existing text file:
1. Navigate to your Applications folder and launch TextEdit.I can’t help but point out that the OS X Quick Look feature (which I discuss in Book II, Chapter 1) displays this same text file with a single key! Just select the file in the Finder window and press the spacebar. (However, you can’t edit a file using Quick Look.)
2. Press •+O to display the Open dialog.
3. Navigate to the desired text file and double-click the filename to load it.
You can easily switch between your iCloud Library and your Mac’s local drives or network drives in the Open dialog. Click the iCloud button or the On My Mac button at the top of the Open dialog.4. Click the insertion cursor anywhere in the file and begin typing. Or, to edit existing text, drag the insertion cursor across the characters to highlight them and type the replacement text.
You can also open an existing text file by dragging its icon from the Finder window to the TextEdit icon.
TextEdit automatically replaces the existing characters with those that you type. To simply delete text, highlight the characters and press Delete.5. After you finish editing the document, you can overwrite the original by pressing •+S (the same as choosing File➪Save).
6. Exit TextEdit by pressing •+Q.

1. Load the audio CD into your Mac’s optical drive.
A CD volume icon appears on your Desktop. OS X automatically loads iTunes, displays its spiffy window, and begins playing the disc.
The first time you run iTunes, you’re asked to configure the program and specify whether OS X should automatically connect to the Internet to download the track titles for the disc you’ve loaded. I recommend that you accept all the default settings and that you allow automatic connection. Is simple, no?
2. If iTunes doesn’t automatically play the disc, manually start the music by clicking the Play button at the upper left of the iTunes window.
To play an individual track, double-click the track name in the iTunes window.3. If iTunes asks whether you’d like the music from the CD added (or imported) into your iTunes music library, accept or decline.
If you’d like to listen to the contents of the CD without having to load the physical disc in the future, feel free to import the CD tracks to your library — as long as the original CD is your property, of course!4. To adjust the volume from iTunes, drag the Volume slider to the left or right.
The slider is to the right of the Play and Fast Forward buttons.5. To eject the disc and load another audio CD, press •+E, click the Eject icon next to the CD entry in the Source list, or choose Controls➪Eject Disc.
6. Exit iTunes by pressing •+Q.
Back to the story! To record a disc, follow these steps:
1. Load a blank CD-R, CD-RW, DVD-R, or DVD-RW into your drive.
I assume for this demonstration that you’re using a write-once CD-R.2. For this demonstration, choose the default, Open Finder.
A dialog appears and prompts you for an action to take.
OS X displays an Untitled CD volume icon on your Desktop. (It’s marked with the letters CDR so you know that the disc is recordable.)3. Double-click the Untitled CD icon to display the contents — it’ll be empty, naturally.
4. Click and drag files and folders to the CD window as you normally do.
5. Rename any files or folders as necessary.
Unfortunately, OS X doesn’t support recording from Finder for some external and third-party drives available for the Macintosh. If you can’t burn from Finder (or you’re willing to pay for a lot of extra recording formats and features), I recommend that you buy a copy of Roxio Toast Titanium recording software (www.roxio.com).After you’ve started recording, this stuff is etched in stone, so your disc window should look just like the volume window on the finished CD-ROM.6. Click the Burn button next to the disc heading in the Finder window sidebar, or click the Burn button in the CD window.
The Big X displays a confirmation dialog.7. If you’ve forgotten something, you can click the Cancel or Eject button. Otherwise, click the Burn button and sit back and watch the fun.
Most of us have a Universal Serial Bus (USB) printer — the USB being the favored hardware connection in OS X — so as long as your printer is supported by OS X, setting it up is as easy as plugging it into one of your Mac’s USB ports. The Big X does the rest of the work, selecting the proper printer software driver from the Library/Printers folder and setting your printer as the default power of the universe.
Before you print, preview! Would you jump from an airplane without a parachute? Then why would you print a document without double-checking it first? Most applications now have their own built-in Preview thumbnails in the Print dialog, as shown in Figure 3-9 — this is definitely A Good Thing! However, if the application you’re using doesn’t have a Preview display in the Print dialog (or if it’s too small to see clearly), I recommend that you click the Preview button with abandon. OS X opens the Preview application to show you what the printed document will look like, possibly saving you both paper and some of that hideously expensive ink or toner. When you’ve finished examining your handiwork, close the Preview application to return to your document.

1. In your application, choose File➪ Print or press the •+P keyboard shortcut.In most applications, OS X displays the simple version of the Print dialog. (To display all the fields that you see in Figure 3-9, click the Show Details button at the bottom of the sheet.) Some applications use their own custom Print dialogs, but you should see the same general settings.

2. Click in the Copies field and enter the number of copies that you need.Of course, there are more settings and more functionality to the printing system in OS X, and I cover more complex printing topics in much more detail in Book VII, Chapter 4. However, I can tell you from my experiences as a consultant and hardware technician that this short introduction to printing will likely suffice for 90 percent of the Mac owners on Earth. ’Nuff said.You can also enable or disable collation, just as you can with those ohso-fancy copiers.3. Decide what you want to print.4. (Optional) Choose application-specific printing parameters.
- The whole shootin’ match: To print the entire document, use the default Pages radio button setting of All.
- Anything less: To print a range of selected pages, select the From radio button and enter the starting and ending pages (or, if the application allows it, a selection of individual pages).
Each OS X application provides different panes so that you can configure settings specific to that application. You don’t have to display any of these extra settings to print a default document, but the power is there to change the look dramatically when necessary. To display these settings, open the pop-up menu in the center of the Print dialog and choose one of these panes. For example, if you’re printing from Contacts, you can choose the Contacts entry from the pop-up menu and elect to print a phone list, an envelope, mailing labels, or an e-mail list.5. When everything is go for launch, click the Print button.
Комментариев нет:
Отправить комментарий