4.7 Deleting User Accounts
An administrator can easily delete user accounts. If nobody has ever used a user account, then deleting the account is no big deal. But if someone has used the account, the decision to delete it is more complicated. When you delete a user account, you also delete all e-mail messages downloaded to the computer, Internet favorites, music, pictures, and videos. You could also delete all of that user’s saved files if you’re not careful. Doing this by accident would be a disaster because there’s no way to undo the deletion.
So let’s assume you understand the consequences and have no intention of deleting an account just for the heck of it. Only administrators can delete user accounts. So if you’re in a standard account, you at least need to know the administrative password to delete a user account. You also need to log in to any account except the one you intend to delete. Then follow these steps:
1. Display the Control Panel, click User Accounts, and click Manage Another Account.If you choose Delete account, the user’s account will no longer exist. If you choose Keep Files, the user’s saved files (those from his account’s profile) will be in a folder on the desktop. That folder will have the same name as the user account you just deleted. Otherwise, nothing of the user’s account, not even his or her saved files, will remain. (If you choose Cancel in Step 4, the entire account remains intact and unchanged.)
2. Click the account you want to delete.
3. Click Delete the Account and read the resulting message. Then click one of the following buttons:
■ Delete Files: Click this button only if you intend to delete everything associated with the account, including all files that the user has created and saved.4. Read the next page to make sure you understand the consequences of your choice. Then click Cancel if you change your mind, or click Delete account if you’re sure you know what you’re doing.
■ Keep Files: Click this option to save the user’s files. You will still lose the user’s saved e-mail messages, Internet favorites, and user account.
If you create a new user account with the same name as the one you just deleted, the new account is still an entirely new account. It won’t inherit any files or settings from the account you previously deleted.

4.8 Using User Accounts
As mentioned at the start of this chapter, each user account is like its own separate PC. Every user has his or her private Documents, Pictures, Music, and Video folders for storing files. Each user account can have its own Windows apps, e-mail account, and Internet favorites. Each user can customize the desktop, Start screen, and other settings to that user’s own liking.When you first start your computer, the Windows lock screen appears. Press Enter, swipe up (on a tablet or touch screen), hit the spacebar or roll the mouse wheel up to display the sign in screen. You also see the sign on screen when you sign out of your user account. If you click a user account that isn’t password-protected, you’re taken straight into the account. But if you click the picture for a password-protected account, a password prompt appears.
To get into the account, you need to enter the appropriate password. If you enter the wrong password, a message appears letting you know that the user account name or password is incorrect. You can click OK to try again. You can’t get into the user account until you’ve entered the correct password for the account.
The first time you or someone else logs in to a new user account, it’s just like starting Windows 8.1 on a brand-new PC. The desktop has the default appearance. All the document folders in the account are empty. There are no e-mail accounts, no Internet favorites, and no Windows apps installed. To use e-mail, the user needs to set up the account with an e-mail account, preferably an account used only by that user.
The user does have access to all the programs installed on the computer (except for rare cases in which someone installed a program for personal use only). The user will likely have Internet connectivity through the same network or Wi-Fi as all other user accounts.
If the user account is a standard account, there are some limitations to what the user can do. For one, Windows settings are not synced with other devices, such as a Windows Phone or tablet. Also, the user can’t make any changes to the system that would affect other users. That’s where Windows 8.1’s User Account Control security comes into play.
4.8.1 Understanding User Account Control
User Account Control (UAC) is the general term for the way administrative and standard user accounts work in Windows 8.1. As you browse around through various pages in the Control Panel, you’ll notice that many links have a shield icon next to them.Items that have a shield icon next to them require administrative approval. Items without a shield icon don’t. For example, any user can change his or her Windows password, with or without administrative approval.
Options that do have a shield icon next to them require administrative approval. But you don’t necessarily need to be logged in to an administrative account to use those options. You just have to prove that you have administrative privileges. You do that by entering the password for an administrative account. To prove you have administrative privileges on this computer, enter the password for the administrative user account and click Submit (or OK in some dialog boxes).
Of course, when someone who doesn’t know the administrative account password encounters the User Account Control dialog box, he or she is stuck. Users who don’t know the password can’t go any further. This prevents the standard user from doing things that might affect the overall system and other people’s user accounts. It also prevents children from overriding parental controls. (You learn how to set up parental controls in Chapter 6.)
4.8.2 Privilege escalation in administrative accounts
If you happen to be logged in to an administrative account when you click a shielded option, you don’t need to enter an administrative password. After all, if you’re in an administrative account, you must already know the password required to get into that account. You don’t need to prove that you know that password again. But, by default, you’ll still see a prompt telling you that the program you’re about to run makes changes to the system. You have to click Continue to proceed.It might seem odd (and irritating) that you still have to click something to get to the item you clicked. But it works that way for a reason. The dialog box lets you know that the program you’re about to run is going to make changes to the overall system. You expect to see that dialog box after you click a shielded option. And with time and experience, you’ll learn to expect it when you do other things that affect the system as a whole, such as when you install new programs.
Sometimes it occurs when you don’t expect to see it. For example, when opening an e-mail attachment, you wouldn’t normally expect to see that message. After all, opening an e-mail attachment should just show you the contents of the attachment, not make a change to the system as a whole. Seeing the warning in that context lets you know that something fishy is going on, most likely something bad in the e-mail attachment. You can click Cancel to not open the attachment, thereby protecting your system from whatever virus or other bad thing lies hidden within the e-mail attachment.
On a more technical note, UAC operates on a principle of least privilege. When you’re in an administrative account, you actually run with the same privileges as a standard user. This is done to protect your system from malware that would otherwise exploit the privileges of your administrative account to make malicious changes to your system.
When you enter a password or click Continue in response to a UAC prompt, you temporarily elevate your privileges to allow that one change to be made. After that change is made, you’re back to your more secure standard user privileges. This is how things have been done in high-security settings for years, and it’s considered a security best practice.
4.8.3 Turning UAC on and off
If at all possible, you should follow standard best practices and keep UAC active on your own computer. But if it proves to be impractical, you can turn off UAC.Even though it is much improved from Windows Vista and Windows 7, UAC is not always a very popular Windows 8.1 feature. After all, nobody wants a feature that makes them do more work, even when the extra work is nothing more than an occasional extra mouse click. Furthermore, sometimes UAC is just impractical. For example, if you give your kids standard user accounts, they can’t install their own programs. But if you give them administrative accounts, you can’t institute parental controls.


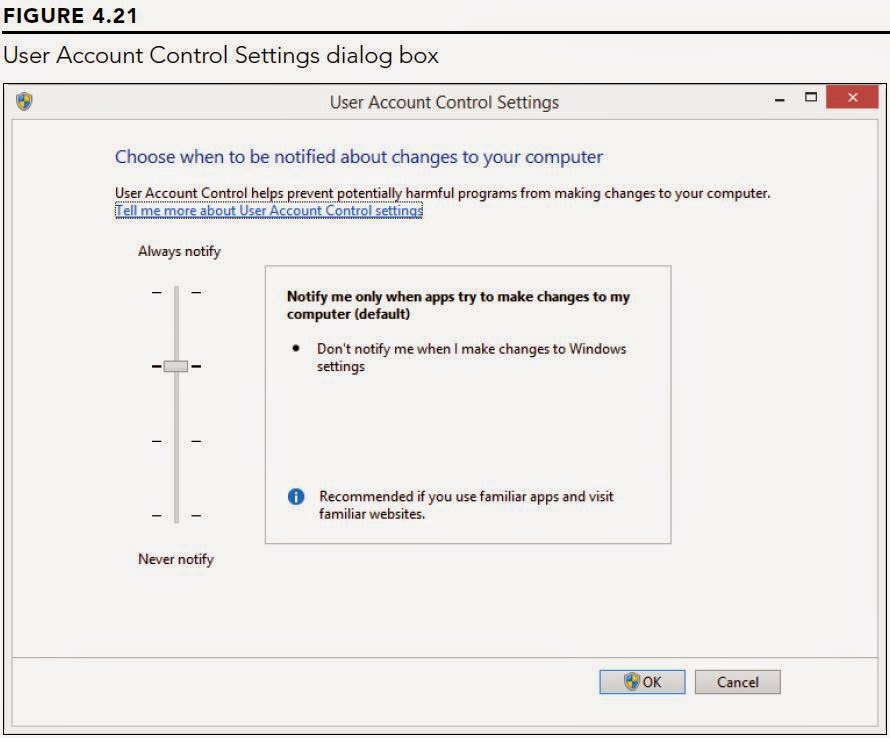 Changing UAC settings is a simple process. From the Windows 8.1 interface, display the Charms Bar and click Search, choose Settings from the drop-down list and enter User in the text field. Or from the Start menu, select Control Panel, click User Accounts and Family Safety, and then click User Accounts. Or from the desktop, press Windows+W and click Control Panel. Click User Accounts and Family Safety and then click User Accounts. Click Change User Account Control settings and then, if prompted to do so, enter an administrative password to get to the dialog box shown in Figure 4.21.
You can choose from the following options:
• Always Notify: Windows will notify you if programs try to install software or make changes to the computer, or if you make changes to Windows settings.To turn UAC off, drag the slider down to Never Notify. Or, if it was already off and you want better security, drag the slider up to the desired level. Then click OK.
• Notify Me Only When Apps Try to Make Changes to My Computer (Default):
Windows will not notify you when you make changes to your computer, but it will notify you, by dimming the desktop and displaying a warning, if programs attempt to make changes.
• Notify Me Only When Apps Try to Make Changes to My Computer (Do Not Dim
My Desktop): Windows will not notify you when you make changes to your computer, but it will notify you when programs attempt to make changes. However, Windows will not dim the desktop; instead, it will just display a message.
• Never Notify: Windows will not notify you of changes (this turns off UAC). The only safe time to use this option is when you need to install a program that doesn’t work with UAC. Turn off UAC, install the program, and then turn on UAC again.
If you turned off UAC, when you click a shielded option you’ll receive no prompting for credentials or status checking. Things will basically be as they were in Windows XP and other earlier versions of Windows.
4.9 Creating and Using Password Reset Disks
A password reset disk is an important part of any password-protected PC. It’s the only method of password recovery that allows you to retain all data in an account in the event of a forgotten password. Advanced features such as EFS (Encrypting File System) encryption, personal certificates, and stored network passwords can be recovered only by using a password reset disk.The trick is that you need to create the password reset disk before you forget the password. You can’t do it after you’ve forgotten the password. Keep that disk in a safe place where you can find it when you need it, but where others can’t find it to gain unauthorized access to the administrative account.
A USB flash drive or memory card works equally well. However, a memory card will work only if your computer has slots for inserting a memory card.
4.9.1 Choosing a memory device for the password reset
A USB flash drive (also called a jump drive) is a small device that plugs into a USB port on your computer and looks and acts like a disk drive. A memory card is a storage device commonly used to save pictures in digital devices, like cameras or smartphones. If your computer has slots for such cards, you can slide a card into the slot and treat the card just as you would a USB flash drive.To see examples and get an idea of cost, check out some online retailers. Then search the site for flash drive, jump drive, or memory card reader to view available products. If you’re looking at memory card readers, the kind that plug into a USB port will be the easiest to install. Many retail department stores that sell computer or office supplies also carry flash drives.
4.9.2 Creating the password reset disk
To create a password reset disk, log in to the password-protected administrative account you created. Connect a jump drive to a USB port, or put a spare memory card in a memory card slot. Launch the Password Reset Wizard by going to the Windows Start screen, pressing Windows+W, and typing Password Reset into the search field. Click the Create a Password Reset Disk item. Then follow these steps:1. Read the first page of the wizard that opens and click Next.Keep the drive or card in a safe place. If you use a jump drive that you also use for other purposes, make sure you don’t erase the userkey.psw file. That’s the file needed for password recovery.
2. Choose the drive letter that represents the jump drive or memory card; then click Next.
3. Type the password for the administrative account you’re currently logged into and click Next.
4. When the progress indicator is finished, click Next and then click Finish.
4.9.3 Using the password reset disk
If you ever need to use the password reset disk to get into the administrative account, first start the computer and click the administrative account for which you created the password reset disk. Take a best guess at the password and press Enter.If the password is rejected, insert the USB flash drive or memory card you created as a password reset disk. Wait a few seconds for Windows to recognize and register the item. Then click Reset Password under the password hint on the login screen.
Follow the instructions presented by the wizard that opens. You won’t be required to remember the original password. Instead, you create an entirely new password and hint for the account. Use that new password whenever you log in to the account from that point on.
4.10 Running Programs as Administrator
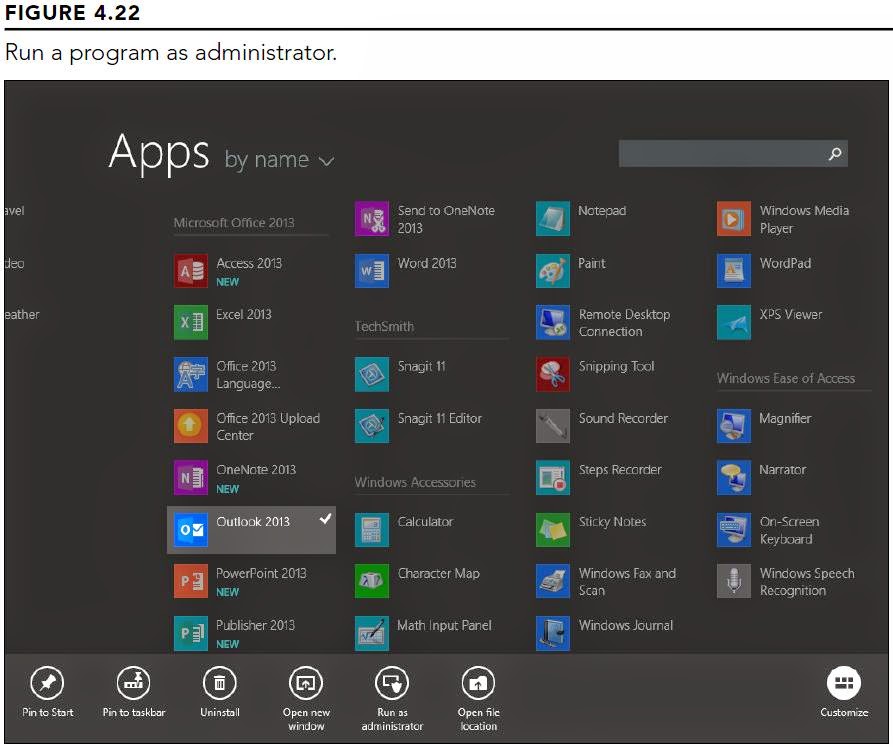 Most newer programs work with UAC’s privilege escalation on-the-fly. But sometimes a program won’t work, especially with older programs. You can run many programs with administrative privileges by right-clicking its startup icon and choosing Run as Administrator, as in the example shown in Figure 4.22.
If the option to run the program as an administrator is not available, then one of the following is true:
• The program doesn’t require administrative privileges to run.
• You’re already logged into an administrative account.
• The program is always blocked from running with elevated privileges.
4.11 Add the Built-in Administrator Account to the Login Screen
The built-in Administrator account is intentionally hidden to discourage users who don’t have sufficient knowledge to understand the risks involved in using such an account. Typically, the only way to get to it is by starting the computer in Safe Mode. If you’re an advanced user and you want to be able to get to that account from the sign-on screen, you just have to enable the account. Here’s how:1. Log in to an account that has administrative privileges.When you log out of your current account, you’ll see the Administrator account on the sign-on screen. It will also appear there each time you start the computer.
2. At the desktop, press Windows+X and click Computer Management.
3. In the left column of the Computer Management tool that opens, click Local Users and Groups.
4. In the center column, double-click the Users folder.
5. Right-click the Administrator account and choose Properties.
6. Clear the check mark beside Account Is Disabled and click OK.
7. Close the Computer Management window.
4.12 Stop Entering Password on Lockout
If you leave the computer for a few minutes without logging out, you’re taken to a lock screen that shows your user account information. If your user account is password protected, you need to enter your password to get back to the desktop. This prevents other people from using your account while you’re away. But this makes sense only in a work environment. In a home environment, it may be overkill. You can reconfigure Windows 8.1 so that you don’t have to reenter your password to get back to your desktop. Here are the steps:1. At the desktop, press Windows+X and click Power Options.
2. In the left column, click Require a Password on Wakeup.
3. Click Change Settings That Are Currently Unavailable. Then elevate your privileges by clicking Continue or entering the password for an administrative account.
4. Choose Don’t Require a Password.
5. Click Save Changes.
4.13 Advanced Security Tools
IT professionals and highly experienced users can also use Local Users and Groups and Local Security Policy consoles for more advanced security configuration. Detailed instructions on using these security configuration tools are beyond the scope of this book and not the kind of thing the average user wants to mess with. However, if you want to access the Local Users and Groups tools, at the desktop press Windows+X and click Computer Management. Then click Local Users and Groups in the left column.To get to Local Security Policy, press Windows+X, click Search, type local, and click Local Security Policy. To find the new settings related to UAC, expand Local Policies in the left column and then click Security Options. The new UAC settings are at the bottom of the list in the content pane.
4.14 Using Credential Manager
Credential Manager (see Figure 4.23) enables you to manage your usernames and their associated passwords (collectively called credentials) for servers, websites, and programs. These credentials are stored in an electronic virtual vault. When you access a server, site, or program that requests a password, Credential Manager can submit the credentials for you so that you don’t have to type them yourself. If your password cache has dozens of sets of credentials in it, you’ll be more than happy to put Credential Manager to work for you.

You can add credentials to your vault directly if you want to. For example, if you have lots of credentials you use with multiple servers or sites, you might want to prepopulate your credential vault so that you don’t have to wait to enter them until the next time you visit that resource.
To add credentials directly, open the User Accounts and Family Safety item in the Control Panel and then click Credential Manager. Click the Windows Credentials icon and then click Add a Windows Credential and in the resulting form (as shown in Figure 4.24), and enter the following:

• Internet or Network Address: Type the path to the resource. For example, enter \\fileserver\Docs to specify the Docs share on a server on the network named fileserver. Or, you would enter portal.mycompany.com if your company intranet portal was located at https://portal.mycompany.com.You can also add a certificate resource, which associates a network resource with a security certificate that is already installed in the Personal certificate store on your computer. In this case, verify that you’ve already installed the certificate, click Add a Certificate-Based Credential (see Figure 4.23), type the resource URL, and click Select Certificate to select the certificate.
• User Name: Enter the username you want to use to log on to the specified service.
• Password: Enter the password associated with the username.
The final type of credential you can add is a generic credential, which are credentials used by applications that perform authentication themselves instead of relying on Windows to perform the authentication. As with a Windows credential, you specify the URL, username, and password for a generic credential.

4.15 Managing Profile Properties and Environment Variables
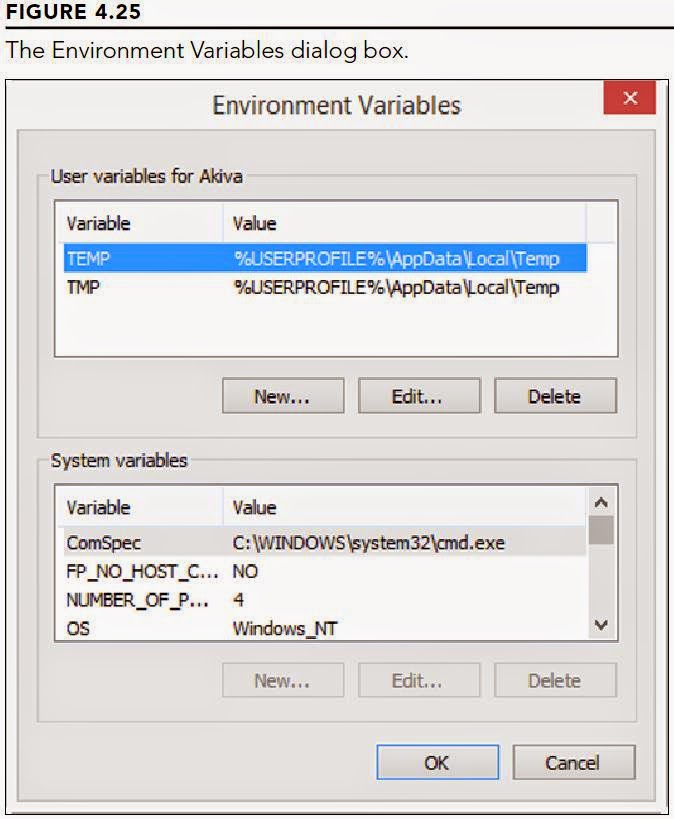 From the earliest days of DOS, the PC operating system we old computer geeks used before Windows came along, environment variables have been used to store information used by the operating system. For example, the TMP and TEMP variables tell Windows where to store temporary files. The PATH variable tells Windows where to look for programs if it can’t find them in the current directory. A number of other system and user variables serve similar purposes.
In most cases, you shouldn’t need to change environment variables. But if you do — such as when adding a folder to the PATH variable — you can do so through your user account properties. Open the User Accounts object in the Control Panel and click Change My Environment Variables. In the Environment Variables dialog box (see Figure 4.25), click the user variable that you want to change, click Edit, modify as needed, and click OK. You can also click New and then add a new user environment variable.

4.16 Wrap-Up
When two or more people share a computer, user accounts enable each person to treat the computer as though it was his or her own. Users can personalize settings to their liking and keep their files separate from other users. Windows 8.1 Microsoft Accounts provide an account structure that enables multiple devices (Windows computer, Windows Phone, Windows tablets, and so on) to sync settings, apps, and other personalized items.User accounts also work in conjunction with parental controls. A parent can set up a password-protected administrative account and then use that account to set up parental controls. You can create standard accounts for children and allow them to log in to their own accounts only.
User accounts also add security to your system by requiring all users to have limited privileges. The general term for security through user accounts is User Account Control (UAC). Some key points to keep in mind:
• At least one person should play the role of administrator for the computer. That person should create a password-protected user account with administrative privileges.
• The administrator should also create a standard account for himself or herself and one for each person who shares the computer.
• All users (including the administrator) should use their standard accounts for day-to-day computing.
• All accounts should have strong passwords.
• All the tools for creating and managing user accounts are accessible from User Accounts and Family Safety in the Control Panel.
Комментариев нет:
Отправить комментарий