понедельник, 2 июня 2014 г.

3-й год 1-я неделя Тренировка-1 1/6 + WB1.5

Давление 119/81, пульс 60, вес 99.9 кг (Минимальное давление, пульс и вес: 123/72, 53, 97.3) 
  
Дневная тренировка
 
Давление 96/73, пульс 89, вес 99.3 кг
 
Тренировка выполнялась без ласт.
 

Level 1 Workout 6 More Stroke Integration and Core Rotation


Training zone: Recovery and low aerobic
Target RPE range: 9 to 11
Target heart-rate range: 70 to 85% of SLTHR
Warm-Up
4 × 25 on :10R TS—alt 25 FB, 25 SGND rt, 25 SGND lft, 25 swim (focus: neutral shoulder)
4 × 25 on :10R—alt 25 SGNU, 25 SGB rt, 25 SGB lft, 25 SGSS (focus: over the keg) IHR or RPE
Main Set
4 × :20 VKR on :10R (focus: tight line, but go schlumpy for a few seconds a few times in the set)
2 × 50 on :15R—alt 25 SGSS, 25 3S&G (focus: over the keg)
2 × 25 on :10R—alt 25 LAR, 25 3S&G (focus: snappy hips)
2 × 50 on :15R TS—alt 25 3S&G, 25 swim (focus: pierce down to extension)
4 × 25 on :10R TS—alt 25 LAR (easy), 25 LAR (faster)
IHR or RPE
2 × 25 swim on :10R TS (focus: wide tracking)
4 × :20 VK on :10R—odd: hands on your chest; even: hands on your head (focus: tight line)
IHR or RPE
Cool-Down
6 × 25 on :10R—alt 25 SGSS, 25 SGB, 25 swim (focus: the glove) IHR or RPE

Total distance: 850
WB1.5
Swim 50m
Swim 50m
Kick 2 x 25m
Swim 50m
Дистанция  20
 
Сауна Сухая: 5 мин 55 секунд
Джакузи: 5 мин 55 секунд 


Выводы: Нормально
 
Общая работа на тренировке: =0.05*99.9*1050 = 5244.75 (Рекордная работа: 5976)
 
Аэробная статистика тренировки:

Общее время тренировки: 01:06:06 (Рекордное время тренировки: 01:08:50)
Total Distanse (m): 1050 (Рекордное Total Distanse (m): 1100)
Килокалорий за тренировку: 839 (Рекордная затрата килокалорий на тренировке: 863)
Strokes: 26.67 (Рекордно низкий Strokes: 22.22)
Stroke rate: 41.11 (Рекордно высокий Stroke rate: 47.00)
Efficiency: 61.06 (Рекордное низкое Efficiency: 58.00)
Stroke Length(m): 1.89 (Рекордное Stroke Length(m): 2.26)
Rest Time: 00:29:05 (Рекордно низкий Rest Time: 00:05:01)
Средний пульс за тренировку: 130 (Рекордный средний пульс: 131)
Максимальный пульс за тренировку: 159 (Рекордный максимальный пульс: 171)
Плотность тренировки: 76.01  (Рекордная плотность: 138.98)


По результатам этой тренировки установлены следующие личные рекорды:

- SGB-lft - 0'55''
- 3S&G - 0'45''
- 3S&G-TS - 0'40''
- Free-swim - 1'9'' 
  
Итого 4 ЛР
 
 
Текущие рекорды:
 
Общее время тренировки -  01:08:50   (Предыдущий рекорд: 01:04:52)
Килокалорий за тренировку - 863   (Предыдущий рекорд: 797)  
Средний пульс за тренировку - 131 (Предыдущий рекорд: 128)
Максимальный пульс за тренировку - 171 (Предыдущий рекорд: 166)
Total Distanse (m) - 1100  (Предыдущий рекорд: 1000) 
Strokes - 22.22   (Предыдущий рекорд: 23.67) 
Stroke rate - 47.00  (Предыдущий рекорд: 44.67)
Efficiency - 56.50  (Предыдущий рекорд: 58.00) 
Stroke Length(m) - 2.26   (Предыдущий рекорд: 2.16)
T-20minFree cruise pace - 3'39'' (Предыдущий рекорд: 05:04)
Дистанция T-20minFree - 550 м (Предыдущий рекорд: 400м)


25 м 

FВ-TS - 0'52''  (Предыдущий рекорд: 0'56'')
ВВ - 1'7''  (Предыдущий рекорд: 1'9'')
SGND-lft-TS - 0'53''  (Предыдущий рекорд: _)
SGND-rt-TS - 0'53''  (Предыдущий рекорд: _)
SGNU-lft - 0'55''  (Предыдущий рекорд: 0'57)
SGNU-rt - 0'54''  (Предыдущий рекорд: _)
BBR-TS - 1'03''  (Предыдущий рекорд: 1'13'')
SGB-lft - 0'55''  (Предыдущий рекорд: 0'56'')
SGB-rt - 0'55''  (Предыдущий рекорд: 1'1'')
LAR-TS - 0'53''  (Предыдущий рекорд: 0'57'')
LAR - 0'49''  (Предыдущий рекорд: _)
SGSS-TS - 0'43''  (Предыдущий рекорд: 0'45'')
SGSS - 0'47''  (Предыдущий рекорд: 0'54'')
3S&G-TS - 0'40''  (Предыдущий рекорд: 0'41)
3S&G - 0'45''  (Предыдущий рекорд: 0'48'')
Free Kick Board - 0'53''  (Предыдущий рекорд: 0'54'')
Dolphin Kick Board - 0'54''  (Предыдущий рекорд: 0'55'') 
Free-swim - 0'31'' (Предыдущий рекорд: 0'36'')
Free-TS-swim - 0'30'' (Предыдущий рекорд: 0'33'') 

50 м

LAR - 2'39''  (Предыдущий рекорд: _)
Free-swim - 1'9'' (Предыдущий рекорд: 1'10'')
 

75 м


100 м

Free-swim - 3'10'' (Предыдущий рекорд: _')

воскресенье, 1 июня 2014 г.

2.3 Menu Mysteries Explained

     Next, I move on to menu control in OS X. Menus are handy drop-down controls that allow you to select commands that are grouped logically. For example, an application’s File menu usually allows you to create or open a document, save a document to disk, or print a document. To open a menu, click the desired menu group name on the bar at the top of the screen and then click the desired menu option from the extended menu.
     Figure 2-7 illustrates the Safari menu. Submenus are designated by rightarrow icons. When you move your mouse pointer over a submenu command, you get another set of even more specific menu commands. In this case, the Services submenu command displays commands, such as Make New Sticky Note and Look Up in Dictionary.
     Some applications allow you to create your own custom menus. Although configuring a new menu system takes some time to figure out, imagine the productivity gains that you’ll enjoy! Custom menus are sleeker and easier to navigate. (However, you have to stop short of claiming that you wrote the application. Software developers get downright snippy about it.)
     OS X also provides another type of menu: contextual. A contextual (or rightclick, or shortcut) menu appears when you right-click certain items, revealing commands that relate specifically to those items. (Unfortunately, the items that sport contextual menus vary from application to application, so check the program’s documentation before you spend countless hours right-clicking everything onscreen.) The same items in the right-click menu appear when you select an item and then click the Action pop-up menu, which looks like a mechanical gear. You can also hold down the Control key while clicking an item to display the contextual menu (or tap with two fingers, if you’re using a trackpad).
     Most manufacturers sell mice, trackballs, and other pointing things that include a secondary mouse button. And Button Number 2 is oft-called the “right-click button.” Generally, if you have a pointing device with multiple buttons, the device displays contextual menus when you click the secondary button. Then again, you might launch Aunt Harriet into a geosynchronous orbit, so double-check the manual for your pointing thing on the default button assignment (and how to change it, if necessary). Note that you can set the behavior of the right button in the corresponding System Preferences pane (usually Mouse or Trackpad).
     Many commands in menus have keyboard shortcuts. Because I hold forth on this subject in the upcoming section, “Keyboard Shortcuts for the True Power User,” I hold off describing those shortcuts here.

2.2 A Window Is Much More Than a Frame: Navigating Windows

     “And in the beginning, there was the window.” Like with older Mac OSes, most of what you’ll do in OS X occurs within these fancy frames. And, as you might imagine, a number of controls are at your disposal, which you can use to control the size, shape, and appearance of these potent portals. In this section, I — well, to be blunt, I do windows. (No squeegee jokes, if you please.)

Opening and closing windows

     Windows are generally opened automatically by an application when you first run it, or it needs to display a document, or by OS X itself, such as when Finder opens a window to display the contents of your hard drive. Finder, by the way, is the application that OS X runs to display the OS X menus and windows.
     Some programs even let you open new windows on the fly; for example, Figure 2-3 shows a window in its purest form: a new Finder window. To display this window on your own Mac, choose File➪New Finder Window or press ⌘+N. From here, you can reach your files on your Mac or even venture to the Internet.
     The Command (⌘) key usually has both an Apple (•) and a rather strangelooking symbol on it that I often call the Spirograph. (I’m told others have called it rather Celtic, but it’s actually a Scandinavian character.)
     When you’re finished with a document or you no longer need a window open, close it to free that space on your Desktop. To close a window in OS X, move your cursor over the Close button; it’s the red circular button at the top-left corner of the window (refer to Figure 2-3). An X appears on the button when you’re in the zone. When the X appears, just click.
     If you’ve been living the life of a hermit for the last two decades or so, pressing the left mouse button is called clicking the mouse. In the modern Apple universe, a Magic Mouse has no visible buttons, and neither do current MacBook trackpads (and the Magic Trackpad)! (You tap the top of the mouse or the trackpad surface with one finger to click.)
     If your Mac is equipped with a Magic Trackpad, never use any object other than your finger on the trackpad! That means no pencils (no, not even the eraser end), pens, or chopsticks; they can damage your trackpad in no time at all. And no, that doesn’t bode well for ladies with long fingernails.
     Most Mac applications don’t want you closing a window willy-nilly if you’ve changed the contents without saving them. For example, try to close a document window in Word without saving the file first. The program asks you for confirmation before it closes the window containing your Great American Novel. Most programs also have a Close command on their File menu. (Here’s another indicator: Most programs display a black dot in the center of the program’s Close button to indicate that there are unsaved changes.)
     To close all windows displayed by a particular program, hold down the Option key while you click the Close button on one of the windows. Whoosh! They’re all gone.

Scrolling windows

     Often, more stuff is in a document or more files are on your hard drive than you can see in the space available for a window. Guess that means it’s time to delete stuff. No, no, just joking! You don’t have to take such drastic measures to see more in a window.
     Just use the scroll bars that you see in Figure 2-4 to move through the contents of the window. By default, scroll bars don’t appear until you move your pointer close to them. You click the scroll box and drag it. For the uninitiated, that means clicking the darker portion of the bar and holding down the mouse button while you move the mouse in the desired direction. Alternatively, you can click in the empty area above or below the scroll box to scroll pages one at a time.
     Depending on the type of application that you’re using, you might be able to scroll a window with your arrow keys as well — or perhaps use the Page Up and Page Down keys to move through a window.

Minimizing and restoring windows

     The multitalented Figure 2-4 also displays another control that you can use with a window: the Minimize button. When you minimize a window, you eliminate it from your Desktop and store it safely on the Dock — that strip of icons that appears along the bottom (or the side) of your OS X Desktop. A minimized window appears as a miniature icon on the Dock by default, so you can keep an eye on it (so to speak). Figure 2-5 illustrates a minimized window from Safari, which is displaying my website at www.mlcbooks.com. To minimize a window, move your mouse pointer over the yellow Minimize button at the top-left corner of the window — a minus sign appears on the button — and then click.
     You’re gonna love this “Easter egg” hidden in OS X. If you hold down the Shift key whilst you minimize, the window shrinks in cool slow motion. (Who says operating systems have to be totally serious, anyway?)
     When you’re ready to display the window again on your Desktop — restoring the window — simply click the thumbnail icon representing the window on the Dock, and OS X automagically returns it to its former size and location.
     By the way, some — note that I said some — applications continue to run when minimized, whereas others simply stop or pause until you return them to the Desktop. Such is the crazy world we live in.

Zooming windows

     Zooming windows has a kind of Flash Gordon sound to it, don’t you think? It’s nothing quite that exciting — no red tights or laser guns — still, when you’re trying to view a larger portion of a document, zooming is a good thing because it expands the window to the maximum practical size for the application that you’re using (and the content being displayed). In some cases, zooming a window fills almost the entire screen; in others, the extra space would be wasted, so the application zooms the window to the maximum size that shows as much content as possible (without any unnecessary white space). The Zoom button can even be disabled by an application that doesn’t want you to muck about with the window; for example, I own some games that don’t allow zooming.
     To zoom a window, move your mouse pointer over the green Zoom button at the top-left corner of the window. Again, refer to Figure 2-4 (in the preceding section), which struts its stuff and illustrates the position. (Man, that is one versatile figure.) A plus sign appears on the Zoom button. Click to expand your horizons.
     After you finish with a zoomed window, return it to its previous dimensions by clicking the Zoom button again.

Those hard-working toolbars

     If you’re wondering what those tiny icons are at the top of many OS X application windows, I won’t leave you in suspense: They’re called toolbar buttons. A toolbar is a strip of icons in a window (usually across the top) that you click to perform common commands, such as changing the display format or printing the current document. (The toolbar in Figure 2-4, for example, features icons to move Back and Forward, among others.) You’ll encounter more toolbar technology throughout the book.
     Most windows that include a toolbar also include some method of hiding the toolbar (to save screen real estate for your document). For example, you can toggle the display of the toolbar on and off in a Finder window from the View menu, or you can use the convenient ⌘+Option+T key shortcut to toggle the toolbar display on and off.

Moving windows

     In contrast to the rather permanent windows in your home, you can cart a window to another portion of the Desktop. Typically, you do this when you’re using more than one application and you need to see the contents of multiple windows. To grab a window and make off with it, click the window’s title bar — the strip at the top of the window that usually bears a document or application name — and drag the window to the new location. Then release the mouse button to plant the window firmly in the new location.
     By the way, some applications allow you to arrange multiple windows in a graceful swoop with a single click of a menu. Open the Window menu and choose Arrange All to perform this magic.
     I talk about Mission Control and Spaces later, in the section “Switching ’Twixt Programs with Aplomb.” Mission Control helps you organize a large number of open windows on your Desktop. You can use it to display all open application windows so that you can pick the one you want, or display all the windows opened by a specific application. Another Mission Control feature — Spaces — allows you to create custom virtual desktops. (Truly cool.) Each of your Spaces desktops can contain a different set of application windows that you use for different tasks!

Resizing windows

     Next, consider how to change the width or height of your window. To change the dimensions of a window to your exact specifications, move your cursor over any edge of the window and then click and hold down the button to drag until the window is the size that you prefer.

Switching windows

     Before I move on to other graphical wonders of OS X, it’s important that you master how to switch between windows on your Desktop. First, remember this old Norwegian saying (or is it one of Mark’s Maxims?):
Only one can be active at one time.
     What our Oslo friends are communicating is that only one window can be active at any time. The active window appears on top of other windows, and it’s the one that you can edit by typing or by moving your mouse. (It also sports Close, Minimize, and Zoom buttons in color, or it fills the entire screen if you’re working in full-screen mode.) Other windows that you have opened might be minimized, as I describe earlier in the section, “Minimizing and restoring windows,” or they can be inactive (mere ghosts of themselves) and remain on your Desktop. OS X dims the controls for inactive windows so that you can tell they’re hanging around but can’t be used at the moment. (Note that both active and inactive windows can contain Finder Tabs, which I discuss in the upcoming sidebar.) Figure 2-6 illustrates a number of open windows, with the iTunes window active.
     I know you’re going to get tired of hearing me say this, but here I go again: Certain applications, such as iTunes and File Transfer Protocol (FTP) clients, continue to run while their windows are inactive. Some programs, however, stop or pause until you make their window active.
     And how do you switch to — activate — a different window in OS X? Again, Mission Control allows you to activate another window, but if the window is currently visible, you can simply click any part of that window. I generally click the window’s title bar if it’s visible, but any part of the inactive window will do. (You can also right-click the application’s icon on the Dock and choose the desired window from the menu.) The window that you click leaps like a proud stallion to the fore, and the previously active window now skulks in the background.
     You can still use a window’s Close, Minimize, and Zoom buttons even when the window is inactive.

2.1 Restarting, Sleeping, and Shutting Down

     First things first. As the guy on the rocket sled probably yelled, “This is neat, but how do you stop it?” Call ’em The Big Four — Sleep, Restart, Shut Down, and Log Out are the OS X commands that you use when you need to take care of business away from your computer. All four appear on the friendly Apple menu (•) at the top-left corner of your Desktop (as shown in friendly Figure 2-1).


     Each option produces a different reaction from your Mac:
✦ Sleep: You don’t need a glass of water or a bedtime story when you put OS X to Sleep, which is a power-saving mode that allows you to quickly return to your work later. (Waking your computer up from Sleep mode is much faster than booting or restarting it, and Sleep mode can conserve battery power on laptops.) Depending on the settings that you choose in System Preferences — which I discuss in Book II, Chapter 3 — your Mac can power-down the monitor and spin-down the hard drives to save wear and tear on your hardware. You can set OS X to automatically enter Sleep mode after a certain amount of mouse and keyboard inactivity. 
     To awaken your slumbering supercomputer, just click the mouse or press any key on the keyboard. MacBook owners can put their laptops to sleep by simply closing the computer; they can wake the beast by opening it back up again.
     The Power Nap feature in Mavericks allows your Mac to take care of business, even while it’s in Sleep mode, because system updates are downloaded, iCloud data and documents are synchronized, and Time Machine continues to back up your hard drive.

✦ Restart: Use Restart if your Mac has suddenly decided to work “outside the box” and begins acting strangely — for instance, if your Universal Serial Bus (USB) ports suddenly lock up, or your Thunderbolt external hard drive no longer responds. First save any work that’s open (unless your computer has locked up altogether). You also elect to restart OS X when you switch startup volumes or switch your Mac to a Windows partition using Boot Camp. (Hint: Some applications and Apple software updates require a restart after you install them.)
 
✦ Shut Down: When you’re ready to return to the humdrum real world and you’re done with your Mac for the time being, use the Shut Down option. Many Mac applications automatically prompt you to save any changes that you’ve made to open documents before the computer turns itself off. You can shut down OS X from the login screen as well.

     Besides the Apple menu (•) command, MacBook laptops have a Power key on the keyboard that you can press to display a dialog with Sleep, Restart, and Shut Down buttons. If you change your mind and decide to tie up loose ends before you leave, click the Cancel button to return to OS X.
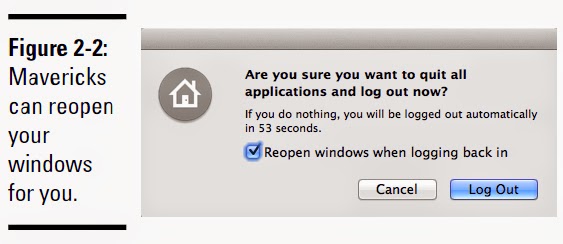
     The Resume feature comes into play when you log out, restart, or shut down your Mac. Select the Reopen Windows When Logging Back In check box (as shown in Figure 2-2), and Mavericks automatically restores the state of your Desktop the next time you turn on your Mac, including all your open windows and selections! Resume also works with individual applications. For example, when you quit Preview, Mavericks saves the current state of that application’s workspace. When you launch Preview again, it displays the windows you were viewing, documents and all. (Note that an application has to be written specifically for OS X Lion or later to support Resume.)
     You can also hold down the Control key and press the Drive Eject key (which you use to load and eject discs) to display the same options.

Chapter 2: Navigating and Running Programs

In This Chapter
✓ Restarting, sleeping, and shutting down OS X
✓ Using windows
✓ Using menus
✓ Recognizing and selecting icons
✓ Using the keyboard
✓ Running applications
✓ Switching between programs
✓ Opening, saving, and quitting an application
     As the folks in Cupertino will tell you, “It’s all about the graphics.” And they’re right, of course. OS X is a highly visual operating system, and using it without a mouse, trackball, or trackpad is like building Hoover Dam with a pocketknife. (And not a particularly sharp pocketknife, either.) Therefore, most of this chapter requires you to firmly grasp the little rodent, roll the ball, or finesse a trackpad. I introduce you to little graphical bits such as icons and menus, and you discover how to open windows that can display anything from the contents of a document to the contents of your hard drive.
     On the other hand, any true Macintosh power user will tell you that the keyboard is still a useful piece of hardware. Because I want you to be a bona fide, well-rounded OS X power user, I also demonstrate the key combinations that can save you time, effort, and possible tennis elbow from all that mouse-wrangling.
     Finally, I lead you through the basic training that you need to run your programs: how to start them, how to open and save documents, and how to quit an application as gracefully as Fred Astaire on his best day.

3-й год 1-я неделя Тренировка-1 3В1- 1/4

Давление до 127/80, пульс 68, вес 100.2 кг (Минимальное давление, пульс и вес: 123/72, 53, 97.3)  
 
Ночная тренировка

Давление после 99/72, пульс 87, вес 99.6 кг 
 
Разминка

1. Прыжки со скакалкой
ВТ/ 20; 26; 24; 20; 20 = 90 + ВТ/10 = 10
Амплитуда: 3 см
Время выполнения: 1.25 мин
Работа: =100.2*(90+10)*0.03 =  300.60    (Рекордная работа: 327.24)
Интенсивность: =300.60/1.25 = 240.48 (Рекордная интенсивность: 392.79)


2. Single-Leg Kick/Deadlift
ВТ/ 2; 4; 5; 2; 2 = 11 + ВТ/1,1 = 2
Амплитуда: 44 см
Время выполнения:  3.0 мин
Работа: =100.2*0.35*0.44*2*(11+2) = 401.20  (Рекордная работа: 433.79)
Интенсивность: =401.20/3.0 = 133.73  (Рекордная интенсивность: 223.09)

3. Длинный цикл:
16кг/ 5, (16кг+18кг)/ 5, 32кг/ 3, (32кг+32кг)/ 2; 3; 2; 2; 2 = 9 + (32кг+32кг)/1 = 1
Амплитуда: 205 см
Время выполнения: 12.75 мин
Работа: =(16*5+32*3)*2*2.05+((16+18)*5+(32+32)*(9+1))*2.05 = 2382.10  (Рекордная работа: 2816.7)
Интенсивность: =2382.10/12.75 = 186.83 (Рекордная интенсивность: 195.73)

  
4. Махи гирей одной рукой
32кг/ 5; 7; 6; 5; 5 = 12 + 32кг/3,3,3 = 9
Амплитуда: 40 см
Время выполнения: 1.5 мин
Работа: =
32*(12+9)*2*0.40 = 537.6  (Рекордная работа: 2150.4)
Интенсивность: =
537.6/1.5 = 358.40  (Рекордная интенсивность: 430.08)


5. Подъем на ступеньку с мышечным забросом гири на грудь  
16кг/5; 10 = 15; 18кг/7; 22кг/5; 32кг/5 + 32 кг/4,3,2 = 9
Амплитуда: 50 см - высота ступеньки, 44 см - подъем гири в исходное положение, 105 см - амплитуда мускульного взятия гири на грудь
Время выполнения:  17.75 мин
Работа: =((100.2+16)*15+(100.2+32)*9)*2*0.5+(16*2+32*3)*0.44+(16*15+32*9)*2*1.05 = 4097.92  (Рекордная работа: 5063.78)
Интенсивность: =4097.92/17.75 = 230.87  (Рекордная интенсивность: 545.46)


6. Подъем на грудь и жим 1 гири 1 рукой на попа
16кг/ 3; 6; 5; 3; 3 = 17 +18кг/2 =2
Амплитуда: 205 см
Время выполнения:  9.25 мин
Работа: =(16*17+18*2)*2*2.05 = 1262.8  (Рекордная работа: 1262.8)
Интенсивность: =1262.8/9.25 = 136.52  (Рекордная интенсивность: 426.40)

7. Работа на шею 
16кг/ 7; 18кг/ 10; 20кг/ 9; 22кг/ 7; 24кг/ 7 + 24кг/5,4 = 9
Амплитуда: 35 см
Время выполнения:  7.5 мин
Работа: =(16*7+18*10+20*9+24*9)*0.35 = 240.8  (Рекордная работа: 420.0)
Интенсивность: =240.8/7.5 = 32.11  (Рекордная интенсивность: 102.67)


8. Подъем согнутых ног сидя на лавочке 
ВТ/ 5; 8; 7; 5; 5 = 25 + (ВТ+3кг)/3 =3
Амплитуда: 35 см
Время выполнения:  1.75 мин
Работа: =100.2*(25+3)*0.25*0.35+3*3*0.35 =  248.64  (Рекордная работа: 256.29)
Интенсивность: =248.64/1.75 = 142.08  (Рекордная интенсивность: 227.50)


9. Straight Bridge
ВТ/ 3; 5; 3; 3; 3 = 14 + ВТ/2 = 2
Амплитуда: 40 см
Время выполнения: 2.25 мин
Работа: =100.2*0.35*(14+2)*0.4 = 224.45  (Рекордная работа: 271.35)
Интенсивность: =224.45/2.25 = 99.76 (Рекордная интенсивность: 237.60)

  
Общая работа на тренировке: =300.60+401.20+2382.10+537.6+4097.92+1262.8+240.8+248.64+224.45 = 9696.11  (Рекордная работа: 18984.41)

 Аэробная статистика тренировки:

Общее время тренировки: 01:48:17 (Рекордное время тренировки: 02:44:24)
Средний пульс за тренировку: 129 (Рекордный средний пульс: 143)
Максимальный пульс за тренировку:
180 (Рекордный максимальный пульс: 186)
Килокалорий за тренировку:
1242  (Рекордная затрата килокалорий на тренировке: 1668)
Процент жира из потраченных килокалорий на тренировке: 21
Время нахождения в зоне 3: 00:20:27 (Рекордное время нахождения в зоне 3: 00:52:03)
Время нахождения в зоне 2: 00:33:16 (Рекордное время нахождения в зоне 2: 01:21:38)
Время нахождения в зоне 1: 00:50:00 (Рекордное время нахождения в зоне 1: 01:57:24)
Плотность тренировки: 89.78 (Рекордная плотность: 216.84)

Результат тренировки: Улучшение общей выносливости

По результатам этой тренировки установлены следующие личные рекорды:

- Работа в Подъем на грудь и жим 1 гири 1 рукой на попа: 1262.8

Итого 1 ЛС

Итоги 52-й тренировочной недели 2-го года занятий

На этой неделе провел: 2 силовые тренировки, 1 плавание и 1 плавание с сыном.
 
Общее время тренировок: 04:57:35 (Рекордное время тренировок: 11:04:18)
Средний пульс тренировок: 125.33 (Рекордный средний пульс тренировок: 138.00)
Максимальный средний пульс тренировок: 172.33 (Рекордный максимальный средний пульс: 183.67)
Килокалорий за тренировки: 3370 (Рекордная затрата килокалорий на тренировках: 4998)
Общая работа на тренировках: 26031.25 (Рекордная работа на тренировках: 49665.70)
Средний вес: 100.32 кг (Рекордно низкий средний вес: 97.60 кг)
Средний пульс за тренировочный день: 78.33 (Рекордно низкий средний пульс: 57.50)

Систола: 116.00 (Наинизшее систолическое давление: 116.00)
Диастола: 80
.00 (Наинизшее диастолическое давление: 76.78)
Плотность: 87.35  (Максимальная плотность: 151.93)
Проплытая дистанция, м: 1000  (Максимальная проплытая дистанция, м: 3950)

На этой неделе установлены следующие личные рекорды:
 
Систола: 116.00
 
 
1 ЛС